LogixNG Tutorial - Chapter 7
This example is a bit complex and needs some introduction on how it works. But it gives a good introduction to the action Sequence which is very useful with LogixNG. This example uses a web page that's included in JMRI. Start PanelPro and open a web browser and visit the page http://localhost:12080/web/logixng_examples/logixng_sequence.html. This link assumes that PanelPro uses the port 12080 for its web server.
Sequence - controlling a crane and a loco
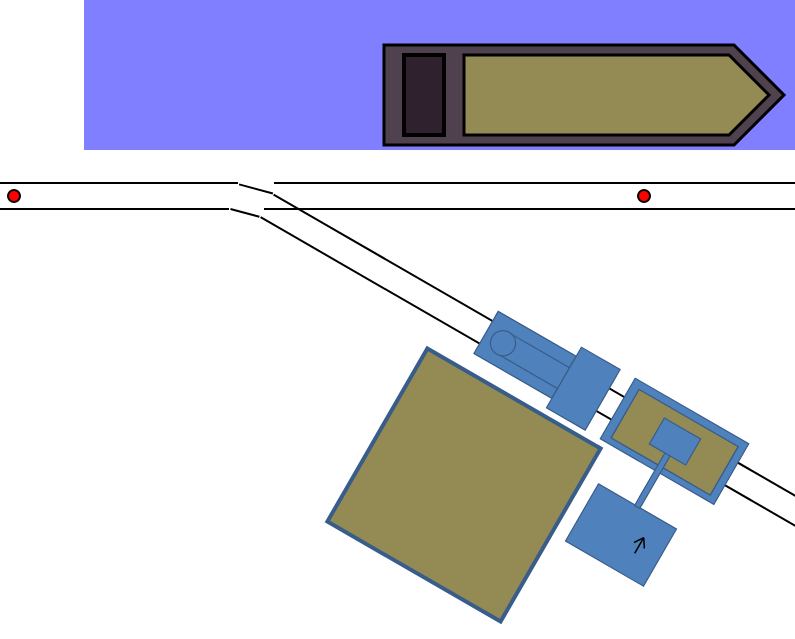
A layout for exhibitions has a coal storage with a coal crane, there the crane loads coal on a wagon which then transports the coal to a harbour and drops the coal into a ship.
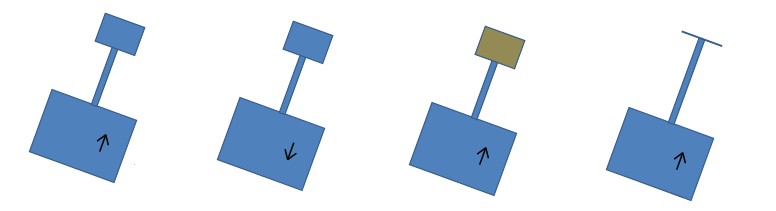
The above image shows the crane in four different positions. The left crane has an empty bucket and the arm
that holds the bucket is in its up position. This demo uses an arrow on the crane's cabin to show if the crane is
up or down. When the arm is up, the arrow points to the bucket. When the arm is down, the arrow points away from the
bucket. The middle left crane has also an empty bucket but the arm that holds the bucket is in its down position. The
middle right crane has a filled bucket and its arm in the up position. The right crane has the bucket open, while the
other three cranes have the bucket closed.
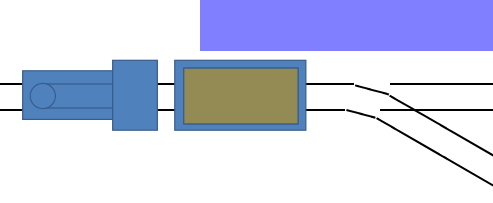
The above image shows the steam engine and a coal car. On this image, the car is loaded with coal. Right to the train
is the turnout that lets the train go either to the harbour or to the coal yard.
Outside of this image, north of the track is the harbour with the ship that gets loaded with coal. And next to the crane is the coal yard there the crane picks up coal to put in the car.
The red circles between the rails are sensors that goes active when the engine or the car is above it.
Running the layout
At first, we try to run the layout manually to see how it works. And to do that, we need to define some sensors and memories in JMRI. There is some support for AnalogIOs in JMRI, items on the layout that uses numbers instead of on/off states, but it's limited today to meters. Therefore, this demo uses memories to send and receive analog values to and from the layout. But the goal is to use AnalogIO devices instead.We have a turnout on the layout:
- IT_7_1 - The turnout
- IS_7_1 - Sensor at the turnout
- IS_7_2 - Sensor at the ship
- IS_7_3 - Sensor at the crane
- IM_7_1 - Crane angle left - right, commanded position
- IM_7_2 - Crane angle left - right, actual position
- IM_7_3 - Crane bucket up - down, commanded position
- IM_7_4 - Crane bucket up - down, actual position
- IM_7_5 - Crane bucket closed - open, commanded position
- IM_7_6 - Crane bucket closed - open, actual position
- Throttle with address 21 - Controls the steam engine
- IS_7_21 - Crane has unloaded coal to car
- IS_7_22 - Car has unloaded coal to ship
- IS_7_11 - Start sequence
- IS_7_12 - Stop sequence
- IS_7_13 - Reset sequence
Some rules when running this layout
The crane will not rotate left-right unless the bucket is in its top position. So if the crane doesn't rotate, make sure that the bucket is lifted to its upmost position.The bucket will not be loaded unless the bucket is opened, moved down to the bottom position and then closed.
The car will not be loaded unless the bucket of the crane is filled and then opened above the car.
Now, lets automate this layout using LogixNG.
To run this layout, we need to be able to do one step at a time. Do thing A, wait for condition B, do thing C, wait for condition D, and so on. For this purpose, we can use the action Sequence. It has three predefined expressions: Start, Stop and Reset, and then a set of actions and expressions that follows these three expressions.Sequence executes the first action and then waits for the first expression to return true. Once that happens, Sequence executes the second action and then waits for the second expression to return true. Once that happens, Sequence executes the third action, and so on.
Sequence may auto start or be started by the Start expression, depending on how the user has configured Sequence. And when the last expression has returned true, Sequence may start over and run the sequence again, if the user has configured Sequence to do so.
For this layout, we use two Sequence. The first runs the train and the second runs the crane. Note that we can have both in the same ConditionalNG.