How to update the JMRI Documentation
JMRI's web pages and help screens are written in a simple subset of HTML, the language that powers the web. The most important part of the content is the plain text that people will read, and the additional formatting information is kept very minimal. To update a JMRI web page, you edit these directly on GitHub web or on your computer with a plain text editor.
Using a word processing app like MS Word or Front Page
to edit these .shtml documents
is not a good idea because they will probably add in their
own proprietary formatting codes that will mess things up,
possibly even to the point of being unusable by JMRI. Also,
don't rename existing files, or make changes to the
formatting information at the top or bottom.
So you may concentrate on making editorial changes to the
text in the main body of a file, which is really what the
readers are paying attention to anyway.
To get started, you can drill down inside your computer's
JMRI program files to the folder for the DecoderPro manual.
On a Windows system, the location for this folder looks
something like this --
C:\ProgramFiles\JMRI\help\en\manual. In this
folder is a file called index.shtml. Open that
file with a text editor and look around. If you change
something, you can then open the page in the JMRI help system
and see how it looks (either keep a backup in case you want
the original page back, or you can reinstall JMRI to restore
it).
The most simple changes are just ones to the text itself: To add a sentence or fix a wording, you just do that with the editor. To add a break between paragraphs, e.g. to add a new paragraph, you insert a "tag" that tells JMRI or a browser to insert a paragraph break.
Creating Images from Screen Shots
For Windows
To snag a screen shot in Windows, start by setting up the window that holds what you want to capture. Make it take up as little space on your screen as you can while it still shows what you want. You can take a shot of the active window (instead of your whole desktop), by pressing the<Alt> key and the <Print
Screen> key at the same time. (Note: Depending on
your keyboard, you might need to press the
<Fn> or <Function-Lock>
key as well.) This puts the image on your "clipboard" and you
can paste it into an image-editing program such as Window's
Paint or Photoshop.
For Linux
If your distro doesn't already have a default application that supports the use of the <Print Screen>> and
<Alt + Print Screen> keys you can install
KSnapshot or your favorite
application to do your screen grabbing.
For macOS
After setting up your shot, hold down<Apple + Shift + 4> key.
When you release them at the same time, the
cursor becomes a plus sign, and you can drag it around the
area you want. When you let go, you will have an image file
on your desktop.
Using a Third-Party Application
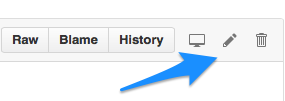
On macOS we nowadays often use Evernote
Skitch
to grab and touch up screen shots. Here's an example of that style:
We also love IrFanView for screenshots, and it is free. With it, you can also include your mouse cursor in your snapshot. You can also take a series of shots easily, and even make a slideshow of them. You can tell it what file format you want the image files to be AND where you want them to be saved before you take the shot, and that makes it easier to work with them in a program like Paint or Photoshop.
Sizing and Saving the Images
Any changes you make to your image should be done before you use Amaya to insert it into your document. Remember that if you change it, it needs to be re-inserted. Make sure you save the image as one of the following filetypes: PNG, JPG, or JPEG (not BMP or TIF), and do not use any spaces or capital letters in the image file name. Generally, a good size for the width of an image is 500 pixels or less, at a web resolution of 72 pixels per inch. If you know how to resize your images, it would be very helpful.Submitting to GitHub
If you understand this, you are ready to help us update the many JMRI documents that we use for both the JMRI website and for the Help files in a next software build.
When you submit your changes to be included in future JMRI releases, they are given a quick check and then merged into the previous content. The check is done by using GitHub tools to find the parts of the file that have been changed.
Prepare the Files
The proper filetype to use for JMRI has the .shtml extension. If you have made a (new) .html or .htm file, you should change the extension to .shtml. Don't use spaces or capital letters in your filenames. If you are not changing or adding images, just save the file with its original name, i.e. "index.shtml", in a location where you can find it easily when you're ready to copy them to GitHub.Send to GitHub
You can view the current JMRI repository on GitHub. To learn how to make changes to connect to GitHub and contribute your changes, please read Using Git.
Thanks and congratulations to all who contributed!
Copyright © 1997 - 2018 JMRI Community.
JMRI®, DecoderPro®, PanelPro™, SignalPro™, TrainPro™, DispatcherPro™, OperationsPro™ and associated logos are our trademarks.
Additional information on copyright, trademarks and licenses is linked here.
Contact us via the JMRI users Groups.io group.
Site hosted by:
![]()
See also the site status page.