Hardware Support: RailDriver Throttle
JMRI support for RailDriver is evolving rapidly, so check
back here or on the JMRI
users group for changes.
Supported Hardware
JMRI allows you to use a RailDriver from PI Engineering as a Hardware Throttle to run Locomotives with your DCC system. RailDriver support was first available in JMRI 2.1.7.
Connecting
Wiring
First, connect your computer to your DCC system and make sure that the regular JMRI Throttles are working fine (Unless you do this first, debugging possible problems connecting the RailDriver is very difficult.)
Next, plug the RailDriver into a USB port on your computer while your JMRI application (PanelPro or DecoderPro) isn't running.
Settings
Once connected, start the JMRI program and select "RailDriver Throttle" from the Debug menu (It's temporarily located there while we develop the support).
A Throttle window titled "RailDriver" should open:
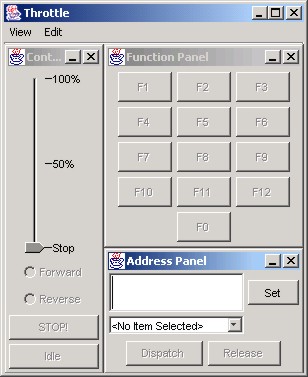
Type the DCC address of your Locomotive into the address box, just like a regular JMRI Throttle, and click "Set". This connects both the Throttle window and the RailDriver console through the DCC system to the decoder. You should now be able to operate the Locomotive from the RailDriver.
Raildriver Tools
- The top row of buttons across the front edge control the decoder functions. The left most (#1 in the figure) is F0, usually the headlight. The next button to the right (#2 in the figure) is F1, etc. When you press the button, the function toggles: From Off to On, or On to Off. Try pressing one, and see if the Throttle function buttons on the screen and the functions in the Locomotive respond.
- The "Bell" button (#37 in the figure) drives F3 (this can be changed by editing a file in the JMRI distribution if your DCC system uses something different). It's momentary, so F3 is set on when the button is pressed, and off when it's released.
- The horn lever (#38 in the figure) operates F2. Push it forward or back to turn F2 On, and release or center it to turn F2 Off.
- The left-most large handle, labeled "Forward N Reverse" (#39 in the figure) serves to control direction. Since (most) DCC decoders don't have a neutral position, the N position isn't used.
- The next lever, labelled "Dyn Brake Throttle" (#40 in the figure), controls the decoder speed setting. For now, zero speed is (roughly) the center, and higher speeds are when the lever is pulled back.
Eventually, we'd like to make a more detailed simulation available by connecting the rest of the controls, and adding a detailed model of the trains braking and acceleration.
Documentation
JMRI Help
For technical information on Raildriver, please see the Details Help page.
Thanks and congratulations to all who contributed!
Copyright © 1997 - 2018 JMRI Community.
JMRI®, DecoderPro®, PanelPro™, SignalPro™, TrainPro™, DispatcherPro™, OperationsPro™ and associated logos are our trademarks.
Additional information on copyright, trademarks and licenses is linked here.
Contact us via the JMRI users Groups.io group.
Site hosted by:
![]()
See also the site status page.