The Light Table
Lights are digital output bits that function as on/off switches. Lights were created to provide easy control for fascia panel lights and scenery lighting. Lights can also be used for any purpose that requires an on/off switch. A Light can be used, for example, to activate an electromagnetic decoupler for a pre-determined time in response to a fascia panel button, or play a layout sound via a stationary decoder.
Lights share available digital output bits with Turnouts. Either a Light or a Turnout, but not both, can control a specific digital output bit. Since Lights lack the feedback structure of Turnouts, Lights should not be used to control track switches (turnouts) on the layout; only Turnouts should be used to control track switches. For historical reasons, Signal Head appearances are defined using Turnouts, even though they may actually be physical lights. So Turnouts should be used to reference the digital output bits used with JMRI Signal Heads. Lights should be used if you need a simple mechanism to control scenery lighting or panel lights, or for other on/off tasks where the control mechanisms of Lights fit the need.
Optionally a Light may be controlled in five ways:
- by a single Sensor
- by two Sensors
- by a Turnout
- by the JMRI Fast Clock
- or switched on for a specified time by a Sensor.
When a Light is created, or when it is read from a configuration file, the Light is 'activated'; it is set up to monitor automatically any changes in state of its control Sensor(s), Turnout, or Fast Clock. When the controlling Sensor, Turnout, or Fast Clock changes in a user-specified way, the Light is switched on or off. Lights can also be controlled by Logix, if more complicated control logic is needed.
The Light Table contains an 'Enabled' column. For a Light
to be triggered by its control Sensor, the Fast Clock, or its
control Turnout, it must be "Enabled", that is, its check box
in the 'Enabled' column must be checked. You can uncheck this
box to temporarily disable a Light from being triggered, i.e.
prevent it switching when its control mechanism fires.
You may change the order of the columns by dragging their titles,
and sort the rows by clicking one of the sort triangles next to
a column title.
A Light may also be a variable light. This will depend on the interface and the hardware driving the physical light.
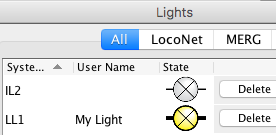
Choose between textual and graphic display of the Light state in the Display preferences.
Switching a Light On or Off
Lights may be turned on or off by clicking the button/icon in the State column of the Light Table. A Light may be set up to follow the state of a track switch (Turnout), On when the Turnout is Closed, and Off when it is Thrown, or vice versa. A Light may be set to follow the state of a block occupancy sensor, on when the sensor is active, and off when it is inactive, or vice versa. A Light may also be set by a fascia panel button if a Sensor for that button is defined as the control Sensor. A Light may be configured to follow the JMRI Fast Clock, On for a specified time period, then Off. A Light may be controlled by two Sensors, On when either of the two Sensors is Active (or Inactive). Two sensor control is useful in controlling layout sounds or crossing gates. A Light may also be controlled from a Logix, as the action of one of its conditionals. If you need more powerful logic to control your Light, consider using a Logix.
Note that Enabled/Disabled applies only to a Light's automated control mechanism. A 'Disabled' state will not prevent a Light from being turned on or off using the button in the Light Table or from being controlled by a Logix.
A variable Light may also be adjusted by entering a value of 0.00 to 1.00 in the intensity column for the Light. A Light that does not support variable intensities will consider any non zero value as meaning On. If a Light has transition effects enabled and configured, the Light will respond according to those options.
The status button for a variable Light will also be a status indication of the variable Light. When it is not On or Off it will show if the last change was moving higher or lower. The intensity displayed will be the current intensity, not the target intensity, when transition effects are enabled.
Creating New Lights
To define a new light, click the Add... button the Light Table. This will take you to a new pane for adding or editing Lights.Saving Lights to Disk
Lights are saved in your layout configuration file, along with Turnouts, Sensors, Signal Heads, etc. To store this information on disk, use Store > in the File menu at the top of the Lights Table (or other tables from the Tools menu), or select Store Panel... in the Panel menu. Note that the enabled/disabled state of each Light is not saved in the configuration file. When Lights are loaded from a configuration file, they are all enabled.
Back to the Lights help intro.
Thanks and congratulations to all who contributed!
Copyright © 1997 - 2018 JMRI Community.
JMRI®, DecoderPro®, PanelPro™, SignalPro™, TrainPro™, DispatcherPro™, OperationsPro™ and associated logos are our trademarks.
Additional information on copyright, trademarks and licenses is linked here.
Contact us via the JMRI users Groups.io group.
Site hosted by:
![]()
See also the site status page.