The Sensor Table
The Sensor Table contains a list of the Sensors that exist for this Panel.
Sensor Table Columns
(You may change the order of the columns by dragging their titles, and sort the rows by clicking one of the sort triangles next to a column title)- User Name
- You can directly enter or change the "User Name" for an existing Sensor (double click in the cell).
- State
- Pushing the "State" button/icon will change the
state of an existing Sensor.
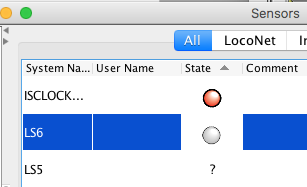 Choose between textual and graphic display of the Sensor state
in the Display preferences.
Choose between textual and graphic display of the Sensor state
in the Display preferences.
- Delete
-
Pushing the "Delete" button will remove the Sensor from
the table.
Note that this doesn't remove the Sensor from any files you've saved that contain it. If you load one of those files, perhaps when you restart the program, the Sensor will reappear. You should use one of the "Store to file" options in the "File" menu to save new versions of any files that contain this Sensor. - Inverted
- When checked, the Sensor command and status is inverted. For example, an inverted Sensor means that when the layout sends an "Active" Sensor command, the Sensor becomes "Inactive" to JMRI.
- Use Global Delays
-
When checked, the Sensor will use the system values
specified in the "Defaults > Global Debounce Delays..."
menu option for the duration which the system waits
before it registers the change of state.
See Sensor Debounce Delay below. - Delay to Active/to Inactive
-
Specify the amount of time in milliseconds that the
system waits before registering the state change of a
Sensor to either state.
See Sensor Debounce Delay below.
Sensor Table Controls
Along the bottom of the Sensor Table pane are buttons and checkboxes that control its operation.
- Add...
- Push this button to add a new Sensor. For more information see Adding/Editing Sensors.
- Show Debounce Delay Information
- When checked, the optional Delay columns are shown.
- Show Pull-Up/-Down Information
- When checked, the optional Pull-Up/-Down columns are shown.
- Show State Query actions
- When checked, an optional Sensor State "Query" and "Forget" button is shown for each Sensor.
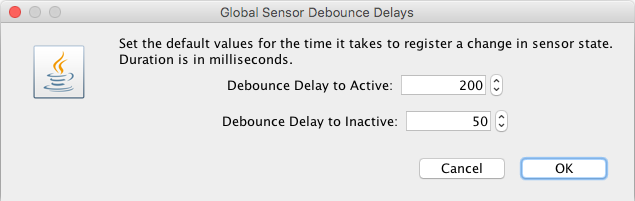
- Defaults menu
The "Global Debounce Delays..." menu lets item you configure default values for both delays.
The "Initial Sensor State" menu item lets you choose what state Internal Sensors will display after startup.
Sensor Debounce Delays
The Debounce Delay facility is there to help prevent
false triggers of a Sensor being passed into the system and
triggering other events in the system.
Such false triggers could be due to a dirty piece of track or
electrical interference.
Debounce Delays, activated from the Sensor Table "Defaults
> Global Debounce Delays..."
menu, allows you to assign a period in milliseconds
before the change is registered with the rest of the system.
If within that period the state has not changed, the Sensor
state will be passed on to the rest the of the system.
However if the Sensors state is different after the timer has
finished, then the system will restart the process. This
time, after the timer has finished it will check to see if
the Sensor is in the same state as it was before it restarted
the process. If not, the process is re-started again until
the state is the same before and after the timer is run.
You can set different delays for a change to Inactive and a
change to Active.
Thanks and congratulations to all who contributed!
Copyright © 1997 - 2018 JMRI Community.
JMRI®, DecoderPro®, PanelPro™, SignalPro™, TrainPro™, DispatcherPro™, OperationsPro™ and associated logos are our trademarks.
Additional information on copyright, trademarks and licenses is linked here.
Contact us via the JMRI users Groups.io group.
Site hosted by:
![]()
See also the site status page.