JMRI Dispatcher: Activate New Train
Introduction
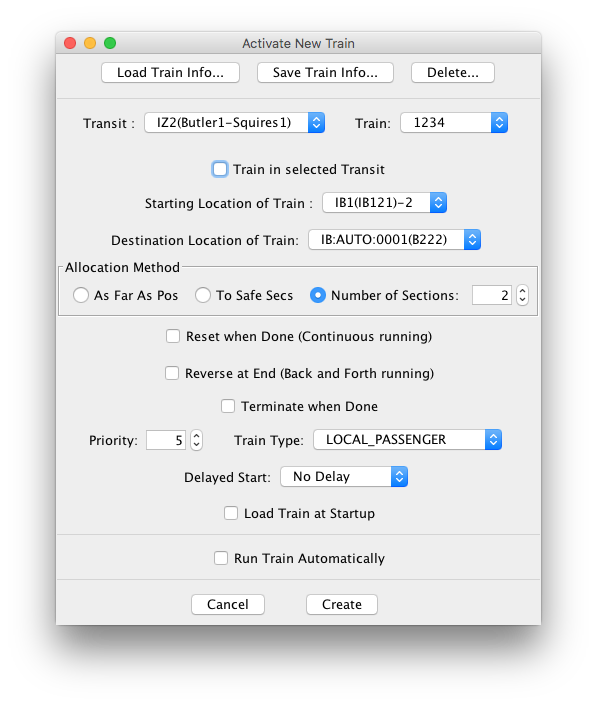
The Activate New Train window supports the creation of a new Active Train. To create an Active Train, the dispatcher uses this window to assign a Transit, assign a train, and specify a starting Block (Train location at start) and an end Block (Train location when transit of the layout is complete). Options for the new Active Train are also set using this window.
Transits are selected from the Transits defined in the Transit Table. Dispatcher will list all Transits that are not currently in Active Trains.
Trains may come from any one of three sources:
- Trains from Roster - Dispatcher will list all trains in the JMRI Roster that are not currently in Active Trains.
- Trains from Trains - Dispatcher will list all trains available from Operations that are not already in any Dispatcher Active Trains.
- Trains from User Entry - Dispatcher will replace the train selection box in the Activate New Train window with two entry fields allowing the user to enter a Train name and a loco Address.
Dispatcher's train source is set by selecting one of the above in the Options window accessed from Dispatcher's Options menu.
Active Trains must start from a Block in the selected
Transit, or from a Block connected to a Block in the selected
Transit. Active Trains must stop in a Block within the
selected Transit. Transits have a direction, so for a
starting Block outside the Transit to be a valid starting
Block, entry to the Transit from the starting Block must
result in travel in the Transit's defined direction. This
window only allows selection of valid starting and stopping
Blocks. Initially the first occupied block is selected for
you in the combo box.
Note: If an expected Block is not in the starting Block
selection box, it may be because of this requirement.
Saving and Retrieving Active Train Information
since 2.5.2To facilitate easy set up of Active Trains that are used more than once, Dispatcher provides for saving and loading train information from disk.
To save your train information to disk, click the Save Train Info... button after all selections and options have been set up but before clicking the Create button. This will bring up a small window allowing you to name the saved train information file. The name you enter will be normalized automatically with any non-alphanumeric characters replaced, and a .xml suffix added if needed. Train information files are saved as .xml files in the dispatcher folder in the user's preferences area on disk.
To load previously saved train information, click the Load Train Info... button immediately after the Activate New Train window is displayed. This will bring up a small window allowing you to select the train information file to load from all the train information files in the dispatcher folder. When a train information file is loaded all items in the Activate New Train window are set according to the saved train information if possible. If an item cannot be set, for example if the specified Transit is in use, a warning is displayed and a default selection is made. After loading, you may change any option or selection and again save your new train information, before clicking the Create button.
To permanently remove an unneeded Train Info file from the dispatcher folder in your user preferences area, click the Delete... button, then select the train information file to be deleted.
Using the Activate New Train Window
To create a new Active Train, use the following procedure:
-
Click the New Train... button in the Dispatcher window to bring up the window shown below.
-
If you want to use saved Train information, click Load Train Info... See above for more on loading Train information.
-
Select a Transit from the Transit selection box. The selected Transit specifies the route the Active Train will follow while running on the layout. Transits are displayed and new Transits are created using the Transit Table accessed from the Tables submenu of the JMRI Tools menu. This Transit selection box will allow selection of any Transit in the Transit Table that is not in use by an Active Train.
-
If the window shown above is displayed, select a train from the Train selection box. This window is displayed if the Trains from Roster or the Trains from Trains options are selected as Dispatcher's train source.
- OR -
-
If Dispatcher Options is set to Trains from User Entry, the following pane is displayed.
Enter a train name in the Train: field, and set a numeric address from 1 to 9999 as the DCC Address.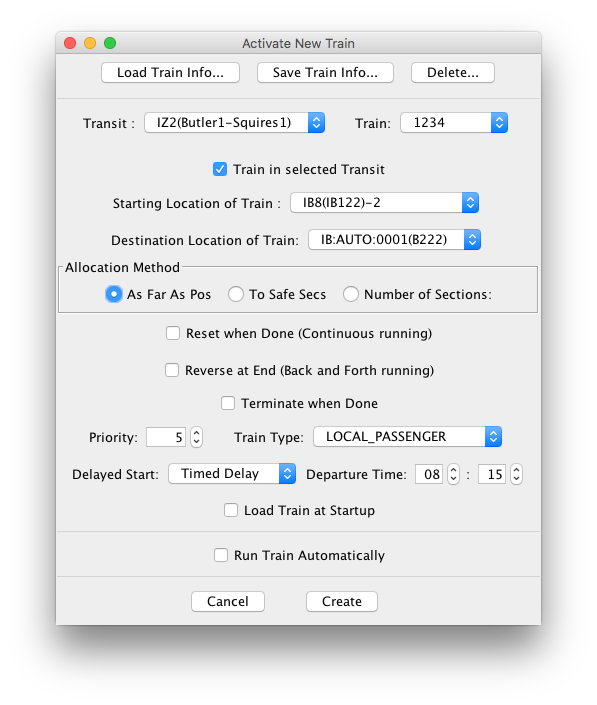
Any short name that identifies the train may be used, provided the name is not being used by another Active Train. DCC addresses must be a number in the range 1 - 9999.
Note: If the train will not be run automatically, the dcc address need not be accurate. This window is displayed if Trains from User Entry is selected as Dispatcher's train source. -
If the starting location of the Active Train is a Block within the selected Transit, check the Train in selected Transit box. If the starting location of the Active Train is outside the selected Transit, (in a Block connected to a Block within the selected Transit) uncheck this box. Checking and unchecking this box results in different selections in the Starting Location of Train: select box.
-
Select a Starting Location of Train: from the select box. This select box lists all Blocks consistent with the check box above and the selected Transit. To identify each Block uniquely, the Block identifier consists of the Block system name, followed by the Block user name (in parentheses) followed by the sequence number of a Section in the Transit definition. If the train is located in the Transit, this sequence number identifies the Section where the train is located. If the train is located in a connected Block, the sequence number identifies the Section that will be entered when the train enters the Transit. If the train spans two blocks, select the Block where the engine is located.
-
Select a Destination Location of Train: from the select box. This select box lists all Blocks consistent with the selected Transit that can be reached from the selected starting location by travel in the direction of the Transit. The Block identifier in the select box consists of the Block system name, followed by the Block user name (in parentheses). If a Section is in the Transit more than once, the sequence number of the destination Section is appended to the Block identifier to identify the destination Block uniquely.
-
Allocation Options since 4.9.5
- As Far As Pos (Allocate As Far As Possible) - Select to allow Dispatcher, when using Auto Allocation, to allocate as far ahead of the Train as allowed by other circumstances such as an occupied Block. Allocation is of course also limited by the Destination Location of Train selection.
-
To Safe Secs (Allocate to Safe Sections) - Choose
this option if you have different trains going through a
single Block in both directions.
Define Transits and mark as Safe the Sections that form passing places for opposing traffic. If there are Alternative Sections in the Transit, mark those as Safe as well.
Note: If you notice that, upon assignment, Turnouts are being set that were already set, you need to select "Trust Known State of Turnouts" in the Dispatcher Options. -
Number of Sections - When using Auto Allocation,
Dispatcher will allocate ahead of the current location of the
Train no more than the entered number of Sections set in the
Spinner.
Because a value of 1 in the current version is known to cause unexpected results, be advised to set it to 2 or higher.
-
Check Reset when Done to set up the Active Train for continuous running. When checked, the train will restart based on the "Add Delay" value. When an Active Train has completed running through its Transit, it is immediately reset to run around its Transit again. Continuous running requires that the selected Transit be set up in a certain way--the first Section and the last Section must be the same. If the selected Transit is not capable of continuous running, the user is warned and Reset when Done remains unchecked.
For more information on setting up a Transit for continuous running see the Transit Table help file. -
Check Reverse at End to set up the Active Train for back and forth running. With Reverse at End selected, when an Active Train is has reached the end of its Transit, the Transit direction is reversed, and the Train backs up through the Transit to its starting point. For back and forth running, the Transit should have at least three Sections, one at each end and at least one in the middle, and the Active Train should fit into each of the end Sections. Continuous back and forth running is accomplished by also checking Reset when Done.
- Enter a Priority for the Active Train relative to other Active Trains. Larger numbers are higher priority. The priority is used by the dispatcher and/or automated dispatching functions to arbitrate between Active Trains if multiple Active Trains are requesting the same resources.
-
Select a Train Type from the Train Type: popup menu. The selected train type is displayed in the Dispatcher window to aid in allocation decisions.
-
If the train is to start at a specified Fast Clock time, check the Delayed Start box, and enter the desired start time in the hour and minute fields of the Departure Time: entry. If the fast clock has not reached the specified Departure Time of an Active Train, the scheduled departure time is displayed in that Active Train's entry of the Active Train table in the Dispatcher window. If an Active Train is waiting for the fast clock, Dispatcher will refuse to allocate Sections to it, however, the dispatcher is given a chance to override this restriction. If an Active Train is being run automatically by the computer (see below), the Active Train will automatically start at the specified fast clock time. This option allows the dispatcher to set up a number of Active Trains which will start at various times during a session.
- Check Load this Train at Startup to have Dispatcher automatically load this Train when Dispatcher starts. You must Save Train Info... for this flag to take effect on the next start.
-
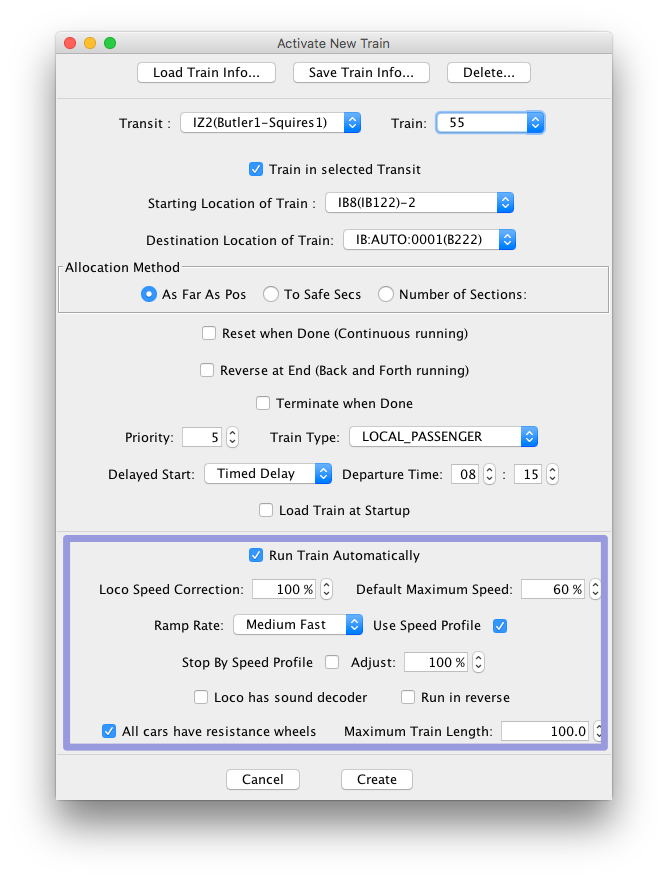
Check Run Train Automatically to request that the Active Train be run automatically by the computer. If the Active Train is to be run manually by a human engineer, skip the next few steps; go directly to the third to last item of these instructions. Requesting Run Train Automatically will extend this window (see below) to display options that are only related to automatic running of trains.
Note: Requirements for automatic running are not validated until creation of an Active Train is requested.
More information about automatic running of Active Trains may be found in the Running Trains Automatically help page. -
In the Loco Speed Correction: field, enter a percentage (10 - 150%) to modify all train speed settings. If the locomotive runs normally, enter 100%. If the locomotive runs slower than normal, enter a factor between 100 and 150%. If the locomotive runs faster than normal, enter a factor less than 100%. This factor is designed to allow the user to compensate for differences between locomotives. The entered Correection factor multiplies all speed settings immediately before the speed is sent to the locomotive.
-
In the Default Maximum Speed: field, enter a number (10 - 100%) to limit the maximum speed the Active Train will run. For example, entering 60% will limit the maximum speed to 60% of the possible speed setting. Maximum Speed can be used to make certain Active Trains, for example a local freight, to run slower than signals alone would determine. The Maximum Speed entered here is the starting value for the Maximum Speed. The Maximum Speed may be changed while running the train automatically by setting up Actions in the Transit. Actions that change the Maximum Speed can be used, for example, to slow an automatically running Active Train when it passes through a town on the layout.
-
Select a Ramp Rate. When a train running automatically needs to change speed, the computer can send the new speed to the locomotive immediately (RAMP_NONE), or it can Ramp the speed to its new value (change the speed gradually) bringing the train to the new speed over a period of time. The Ramp Rate to use depends upon the decoder in the locomotive and how the decoder is set up. Some decoders have features that can change speed gradually (this decoder option is named differently for different decoders). If the decoder is doing the desired job, select RAMP_NONE. Otherwise select one of the ramp rates offered.
- Use Speed Profile - If a locomotive has a Speed Profile, the speed will be set using the Warrant Preferences settings and the speed profile. So if the speed calls for "restricted", it looks that up in the Warrant Preferences, gets the required speed & units and uses the Profile to set the Throttle percentage.
-
Stop By Speed Profile The loco will begin to stop when it enters the Section and -if the profile is accurate and the block lengths are accurate- stop at the far end.
-
Adjust Set the percentage of the final Block length to be used for stopping when stopping By Speed Profiles is set. Small values in small Blocks tend to cause the loco to just stop.
-
Check Loco has sound decoder. if the locomotive has a sound decoder. If this item is not checked, Actions that require a sound decoder, such as ringing the bell or sounding the horn will be skipped.
-
Check Run in reverse if the locomotive is to be run in reverse through the Transit. This should not be confused with the direction through the Transit, which is always FORWARD when the Active Train starts up. Checking this item is equivalent to using the reverse setting on a manual throttle.
This option allows a locomotive to back up through the Transit. For example, a local moves out of a yard automatically in the forward direction to a siding, cars are switched manually, then the locomotive needs to back up automatically to the yard. This could be accomplished using two Active Trains, both running automatically. One would move the train from the yard to the siding with the locomotive moving forward, and the second one, using a different, but similar Transit would back from the siding to the yard, with the Active Train in reverse. This should also cover the situation where forward and reverse are backwards in the locomotive. -
Check All cars have resistance wheels if the entire train is detectable by occupancy detectors of all Blocks in Sections in the Transit. There must be no gaps in detection if this option is checked. This usually means that all cars in the train will have resistance wheels. This is especially important for stopping Active Trains without using point sensors (Stopping Sensors in Sections). If an automatically running Active Train needs to stop in a Section, it will use a Stopping Sensor if one is present. If no Stopping Sensor is configured, and if the train will fit in the Section (see below), and if this option is checked, the train will stop when the previous Section becomes UNOCCUPIED. If this option is not checked, or if the train will not fit, the train is stopped when it enters the Section.
-
Enter the maximum length the train can have while traversing the Transit in the Maximum Train Length: field. The length should be entered in scale feet or scale meters, depending upon the dimension selection in the Dispatcher Options accessed from Dispatcher's Options menu. Entering a reasonable value for the maximum length of the train is important for deciding if a train will fit in a Section when stopping the train (see above). When NOT stopping by Speed Profile, if the length of the train does not fit in a Block when stopping it is stopped immediately. Otherwise it is stopped as soon as the preceding Block goes UNOCCUPIED. Remember this uses debounce timings, which -if large- can result in the train overrunning the block if it only just fits.
-
If you want to save your entered train information for later use, click Save Train Info... See above for more information on saving train information.
-
Click Create after all the above have been set to create and activate the new Active Train. The new Active Train will immediately appear in the Dispatcher window, and this window will be dismissed.
- OR -
-
Click Cancel to exit this window without creating a new Active Train.
Back to Dispatcher help.
Thanks and congratulations to all who contributed!
Copyright © 1997 - 2018 JMRI Community.
JMRI®, DecoderPro®, PanelPro™, SignalPro™, TrainPro™, DispatcherPro™, OperationsPro™ and associated logos are our trademarks.
Additional information on copyright, trademarks and licenses is linked here.
Contact us via the JMRI users Groups.io group.
Site hosted by:
![]()
See also the site status page.