The Icon Editors
Contents of the Icon Editors

Five of the Icon Editors: (Right Hand Turnout, Left Hand Turnout, Sensor, Signal, MultiSensor) display a group of icons above a table. The table lists all of the JMRI entities of the given type that have been defined. There is one icon for each state the entity can have. The icons shown are the default icons, but you may change them.
Below the table are two buttons, Add to Panel and Change Icon.... The Add to Panel button is inactive until a device is selected from the table. Then it becomes active, and when pressed will install the set of icons into the panel. Pressing the Change Icon button is discussed below.
Two other Icon Editors: (Memory Value and Reporter Value) have no icons and no Change Icon button, but do have tables and an Add to Panel button. You must select an entity from the table before the Add to Panel button becomes active. No icons are displayed for these JMRI entities because pressing Add to Panel installs the value maintained by the entity into the Panel.
Another two Icon Editors: (Background Image and Icon (plain)) display a default icon, but no table, since these elements do not represent a JMRI device. For these elements the Add to Panel button is always active.
The remaining two choices for icons: (RPS Reporter and Fast Clock) install their icons directly into the Panel.
Adding JMRI Entities to the Panel
As mentioned above selecting an entity from the table makes the Add to Panel button active. Pressing this button installs the icons for the entity into the Panel.
If a text field appears below the Add to Panel button it may be used to enter a new entity into the table. When a System Name is entered into this text field, the entity is entity is created, its name entered into the table, and the Add to Panel button becomes active. Pressing the button installs the icons for the new entity into the Panel.
Pressing the Change Icon Button
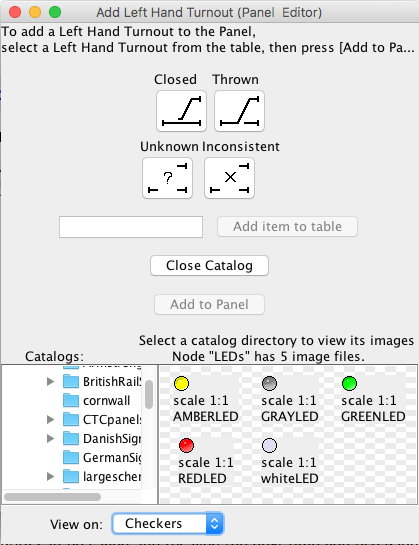
Pressing this button will add a pane labeled Catalog to the window. It will show one or more "trees" in a scrollable panel. Expanding the tree displays "nodes" or branches of the tree that in turn can be expanded. The nodes correspond to things that are file system directories or are similar to file system directories. Whenever image (icon) files are encountered in a node, the images are displayed in a pane below the Catalog tree(s).
This pane is a "Preview" panel of the contents of the node
and has a label that states how many image files have been
found. The panel display all the images that it has found in
the node. Beneath each image (icon) is a label that states
the "scale" at which the image is displayed. "Scale 1:1"
indicates the icon is displayed at full size. If a large
image file had been found, the scale might be 0.25:1 to
indicate that the display is 1/4 the actual size of the image
that could be transferred to the Panel.
since 4.9.7Below the icons is a
"View On:" combo box that allows you to choose the background to
the icons. This may help in determining what parts of the icon
are opaque and what parts are transparent. Initially, the current
Panel background color is used.
The Catalog pane will always display at least one tree titled "Program Directory". This is the resource directory from the jmri.jar that was built when you installed this current version of JMRI. Other trees that you might see are: "pPreferences Directory", if you have created a "resources" directory within your JMRI preferences directory - or possibly see, "Image Index" if it has been created already (see below for more information).
Changing the Icon
Most Icon Editor operations are done by "Drag and Drop". To change an icon, drag any icon from the node display pane at the bottom of the window (i.e. press down on the mouse button and hold it down while moving the mouse) to any of the JMRI entity icons at the top of the Icon Editor. Release the mouse button after hovering over the icon you want to change and the dragged icon will replace it. You may go to other nodes and drag any of icons found there until you are satisfied with the state icons you want to install into the Panel.
The changes you make to the icons of a JMRI entity can be saved and recalled the next time you use PanelPro by using the menu item Store Image Index in the File menu of the Panel Editor. The Store Image Index menu item also appears in the File menu of the Image Index Editor.
Icon Editor Menus
The Find Icons menu has the following items:
- Create/Create/Edit Image Index. This menu item opens a window where you can organize the icons into a scheme that makes them easy to find when you want to use an Icon Editor. See the Image Index Editor page for how this menu item is used.
-
Search File System for Icons. This opens a file
chooser dialog where you may open any directory that that
has image files. Select any directory seen by your
computer and a search for icons will begin. This will
visit every directory under this directory and when it
encounters one with image files, it will open a window
and attempt to display all the images it finds there.
Note: This may take some time.
Depending on how much memory is needed to show all the files, one of the following two sequences of events will occur.
- If there sufficient memory to display the files,
the window will show them along with the radio buttons
to adjust their background. Also, three buttons will be
displayed above the images - Add to Catalog,
Continue Searching and Cancel.
- Pressing Add to Catalog will make this directory one of the trees in the Catalog pane. In this case, you may then use it to select icons to change icons in any of the Icon Editors.
- Pressing Continue Searching will have the search proceed to the next directory found with image files.
- Pressing Cancel will close the window with no further action.
- If there is not enough memory to display all the
image files found in the directory, a message will
state how many files can be displayed. Press OK
and most likely another message will be posted
explaining that if you want to add any of these images
to the Catalog you should move or copy the ones you
want to another directory. Again press OK and
the window will display what it can. In this case, the
three buttons are Show More, Continue
Searching and Cancel.
- Pressing Show More will display the next group of image files from the directory that it is able to display.
- Pressing Continue Searching will have the search proceed to the next directory found with image files.
- Pressing Cancel will close the window with no further action.
Note the latter case generally occurs when you open a sizable photo album directory.
This is a feature to be used sparingly, but many interesting icons can be found, particularly those cached by your browser. You might have a use for them.
- If there sufficient memory to display the files,
the window will show them along with the radio buttons
to adjust their background. Also, three buttons will be
displayed above the images - Add to Catalog,
Continue Searching and Cancel.
Making New Icons Available to the Panel
You can also create your own icons. There are two ways you can make these permanently available to the Panel Editor.
- Create an Image Index Catalog that is saved to disk and will appear automatically in the Catalog pane. Use the Create/Edit an ImageIndex Catalog menu item to create and edit an ImageIndex. The ImageIndex will be preserved unchanged during an upgrade. See the Image Index Editor page for more detail.
- Create a new folder named "resources" in your JMRI Preferences directory. Add your new icons to that folder. This will prevent any possible conflicts or loss of data during an upgrade. These new items will automatically appear under "Preferences Directory" in the icon Catalog.
Changing the Default Icons
The icons displayed when you first open an Icon Editor are the default icons. You may change these defaults by storing icons of your choice to be the default icons for each Icon Editor.
- After you have modified the icons by dragging icons from the "catalog pane" and dropping them on the default icons, use the "Store Image Index" menu item under the "File" menu on the Panel Editor window.
- Alternatively, if you close the Icon Editor you will be
prompted with a dialog asking if you want to Save these
icon choices as your defaults. This dialog is also
displayed if changes have been made to the Image Index. The
dialog presents three options:
- Yes - Save any changes that have been made to the default icons or Image Index.
- No - And don't show any more prompts about changes.
- Cancel - Not right now, but prompt me later.
Thanks and congratulations to all who contributed!
Copyright © 1997 - 2018 JMRI Community.
JMRI®, DecoderPro®, PanelPro™, SignalPro™, TrainPro™, DispatcherPro™, OperationsPro™ and associated logos are our trademarks.
Additional information on copyright, trademarks and licenses is linked here.
Contact us via the JMRI users Groups.io group.
Site hosted by:
![]()
See also the site status page.