Fast Clock Setup
Introduction to JMRI Fast Clocks
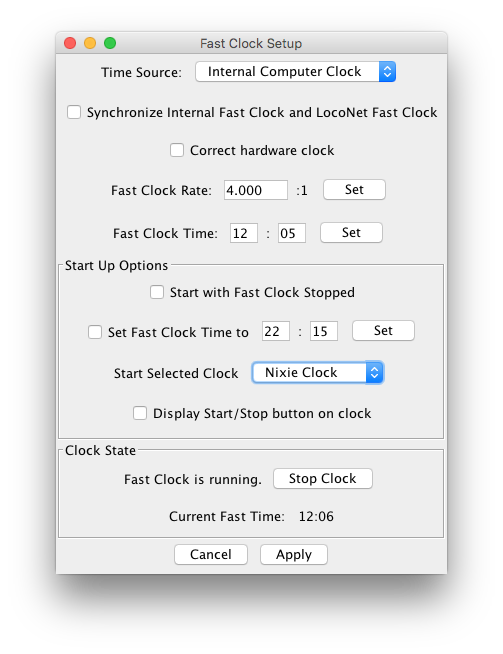
JMRI provides a fast clock that can get its time from an internal fast clock or a selected hardware fast clock if one exists on your DCC system. This dialog (reached from Set up Fast Clock in the Clocks submenu under the Tools menu) provides for setting options for this fast clock system. Information you set up here is saved when you save your panels and configuration. This dialog allows you to set start up options that take effect when you load your panels and configuration. JMRI also has clock displays that can run in stand-alone dialogs or on a PanelPro panel.
Setting up your Time Source
Look in the Time Source popup menu to see what might be available for your system. If you don't have a hardware fast clock, skip to the next section. Usually you will want to select Internal Computer Clock even if a hardware fast clock is available. Usually also you will want to check Synchronize Internal Fast Clock with xxxxx Fast Clock so that the two clocks will show the same time, even over long periods. Both the Fast Clock Rate and the Fast Clock Time are synchronized when you check this option.
For some hardware fast clocks another check box, Correct hardware clock, will be shown. If you tried using your DCC command station to create a fast clock, you may have noticed that it didn't keep particularly good time. If Correct hardware clock is available and you check it, JMRI will adjust the rate of your hardware clock so that it keeps better time.
Not all hardware fast clocks support changing a 12-hour/24-hour display option from the computer. For those that do, a check box labeled Use 12-hour clock display, will be shown. If you check this option, your hardware clock will set up for a 12-hour clock display. If this option is unchecked (the default), a 24-hour clock display will be set up.
If you select Internal Computer Clock as your time source, and do not check either the Synchronize... or Correct... options, only the internal clock will be used, and no commands will be sent to your hardware clock. At the end of this documentation there is more information on specific hardware fast clocks, including recommendations on the best way to set them up.
Caution: This dialog may show you have a hardware fast clock when you really don't have one. For example, if you're running LocoNet Simulator, a LocoNet Fast Clock will be listed but doesn't exist. Unless you know you have the hardware fast clock listed, you should not select the hardware clock as your Time Source, and you should not check either the Synchronize... or Correct... options even if they show on this dialog.
Setting Fast Clock Rate and Fast Clock Time
The Fast Clock Rate is a factor that multiplies the wall clock time rate. For example, a fast clock rate of 4.000 means that the fast clock will run 4 times faster than the wall clock, or will move an hour when the wall clock only moves 15 minutes. Enter your fast clock rate after Fast Clock Rate:, then click the Set button to the right of it. When this button is pushed, JMRI checks the value you entered. If anything is not right, an error message is displayed and nothing is changed. If the entered rate checks out, it is sent to all clocks. (It's important that all clocks run with the same rate, even if they are synchronized.)
The Fast Clock Time is entered as hours and minutes using a 24-hour clock. After entry click the Set button, so JMRI will check the entered time. If anything is not right, an error message is displayed, and the time is not changed. If the entry checks out, the time is immediately changed on all clocks.
Setting Start Up Options
The options set in this section take effect when you load your panel file (or configuration file if you don't have any panels). If Start with Fast Clock Stopped is checked, your fast clock will start up stopped (paused). If not checked, your fast clock will start running immediately after loading. You can request that your fast clock start at a specified time, by checking Set Fast Clock Time to and entering the time after it. As with Fast Clock Time, the time is entered as hours and minutes using a 24-hour clock. After you enter the time, be sure to hit the Set button so the time will be read into the computer.
If you select a display clock in the Start Selected Clock popup menu, that clock display will be automatically started when your file is loaded. This option only applies to clock displays that run in a stand-alone window. Clocks displayed on a PanelPro panel are configured using Panel Editor or Layout Editor, and are saved and restarted with your panel.
Important Note: To preserve the settings and options
entered in this dialog, you must save your configuration.
Fast clock settings are stored as part of your configuration
in the same file as your panels (if you have any). The safest
and easiest way to ensure that all your configuration items
and panels are saved is to save using Store Configuration
and panels.... (Store panels... may be used even
if you don't have any panels.)
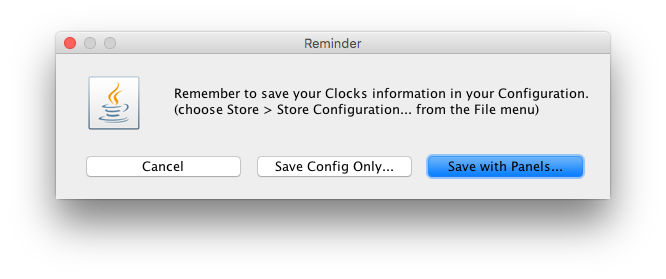 Store options may be found in the File menu
while working on the Fast Clock Setup. A prompt will give
you the option to save either form when you close the
Fast Clock Setup by clicking Apply.
Store options may be found in the File menu
while working on the Fast Clock Setup. A prompt will give
you the option to save either form when you close the
Fast Clock Setup by clicking Apply.
If you want to automatically load your panel file when your application starts, add it to Load panel file at startup: in the Advanced Preferences section of your Preferences... window.
Starting and Stopping the Fast Clock
Your fast clock may be started and stopped using the Start Clock/Stop Clock buttons at the bottom of this dialog. Or you can use the Run/Pause button at the bottom of the Analog Clock. Or you can click on a Sensor Icon on your PanelPro panel (Panel Editor or Layout Editor) that you've linked to the internal sensor with system name ISCLOCKRUNNING. The state of this sensor automatically follows the state of the fast clock-Active if the fast clock is running, and Inactive if the fast clock is stopped. Changing the state of this sensor will start and stop your fast clock. Regardless of which method you use to start and stop your fast clock, button labels and the ISCLOCKRUNNING sensor's state follow along. When the fast clock is restarted after having been stopped, the fast clock time continues where it left off.
Supported Hardware Clocks
-
LocoNet Fast Clock - A Digitrax LocoNet can contain it's own fast clock, driven by the DCS100, DCS200, or DCS50 command stations. A separate LocoNet fast clock is available from Logic Rail Technologies. JMRI can work with any of these, or with any clock that uses the standard Digitrax method to control fast clocks. The recommended settings for running with these clocks is: set Time Source to Internal Computer Clock, and check both the Synchronize... and Correct... options. However you can try other settings. If you use the internal computer clock as the time source, you will not be able to change the fast clock rate or the fast clock time from a throttle.
If you use a Logic Rail Technologies fast clock, it should be set up as a slave clock, not as a master. You may notice that the Logic Rail Technologies fast clock lags behind by one fast clock minute. Be assured that the correct commands are being sent by JMRI. This lag, if present, is just an artifact of the Logic Rail clock's internal programming.
-
NCE Fast Clock - The NCE fast clock can be either a source of fast time or can be commanded to follow the internal clock. The best synchronization is when the NCE clock is the master source. It works by adjusting the internal clock ratio so the fast minutes will be the same. The provides for the clocks to be basically in sync all the time. Adjustments are made about every 20 fast seconds.
You may also have the internal clock drive the NCE fast clock. However, this requires some number of seconds to be added or skipped in the NCE fast clock so the minutes will roll over at the same time. That minute roll over is critical for the NCE as that is when the time is sent to all the Pro cabs. Due to limited adjustments in the NCE fast clock this method causes the clock to run fast for part of the minute and slow for the other part of the minute so the minute roll over is correct.
Clock-related Sensor and Memory
When a clock is running, JMRI creates an internal sensor and a memory variable that you can use to control and access the clock.
The ISCLOCKRUNNING sensor controls whether the clock is running (ACTIVE) or stopped (INACTIVE).
The IMCURRENTTIME memory contains the current fast-clock time, and can be easily accessed from Logix and scripts. The format of the time/date string is controlled by the jmri.jmrit.simpleclock.SimpleClockBundle TimeStorageFormat property, and can be changed via the JMRI Internationalization mechanism. More information on the DateFormat mechanism used for this is available here.
Thanks and congratulations to all who contributed!
Copyright © 1997 - 2018 JMRI Community.
JMRI®, DecoderPro®, PanelPro™, SignalPro™, TrainPro™, DispatcherPro™, OperationsPro™ and associated logos are our trademarks.
Additional information on copyright, trademarks and licenses is linked here.
Contact us via the JMRI users Groups.io group.
Site hosted by:
![]()
See also the site status page.