Adding/Editing a Signal Group
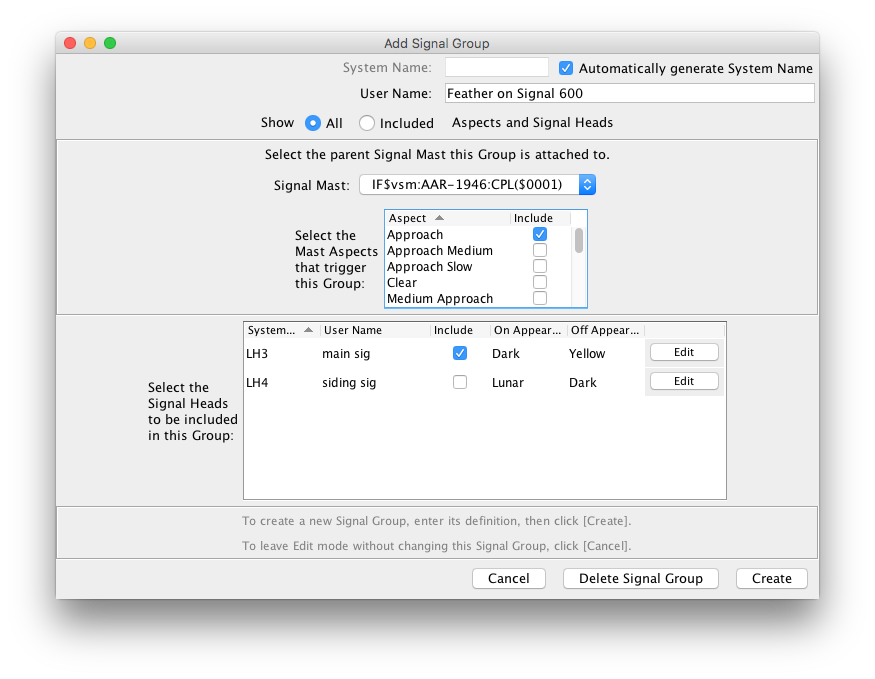
After clicking on the "Add..." button below the Signal Group Table, the following pane appears:

Enter Signal Group elements

Signal Groups are built from one or more Signal Heads and comprise the following:
- A parent Signal Mast (by System Name) to which this Signal Group is attached.
- A list of Aspects that cause the Signal Group to become active eg. the parent Signal Mast must be set for Proceed or Caution, but not Danger.
- A list of Signal Heads that make up each indication of
the Signal Group.
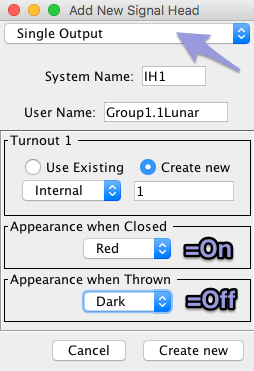
Signal Heads included in a Signal Group are picked from the Signal Head Table, but only Signal Heads that were created using the Single Output connection type (pictured to the right) show up in the list.
In the Add/Edit Signal Group window, after entering a User
Name for the new Signal Group and selecting the parent Signal
Mast from the combo box, check Include behind one or
more Mast Aspects in the table directly below.
Next select one or more Signal Heads by checking their
Include check boxes in the second list.
Click the Apply button at the bottom of the pane or
continue further set up.
Define Signal Group Conditions
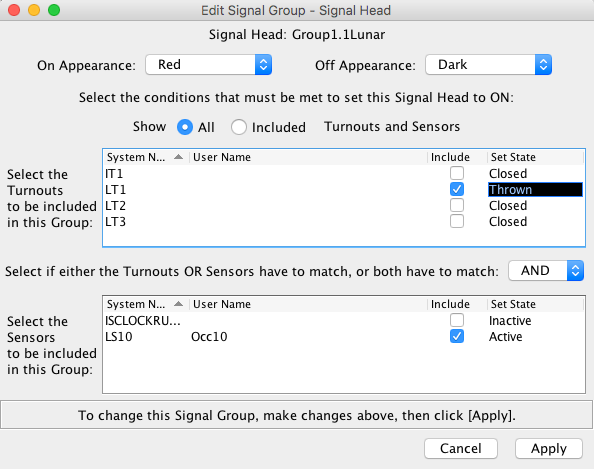
Each Signal Head that you include in Signal Group has a set of criteria that have to be met before that Signal Head is illuminated. These criteria are made up from Turnout and/or Sensor states and can be changed by clicking on the corresponding Edit button in the last column of the Add/Edit Signal Group pane. A new pane like the one shown to the right will open, letting you define a specific Signal Head that is part of your Indicator.

Choose two different values in the pop up menus at
the top of the pane to define the states of the Indicator
Signal Head. On meaning when conditions are met, and Off
as long as that is not the case.
To complete the definition of a Signal Group Indicator Head,
mark the appropriate Include check boxes for both
Turnouts and Sensors, and specify their state in the last
column of each list.
In between both lists there is a final logic
OR/AND option to choose from.
You will need to do some deep thinking to prepare for this last step, as this is the place where you control how your Indicator will behave. The signal hardware on your layout may rule out some options, so build it up in small steps and test often.
Finish the Signal Group definition by clicking Apply in the Signal Head set up pane and again click Apply to close the Signal Group Add pane. Your new Group will appear in the Table.
Back to the Signal Group Table help page.
