JMRI: USB Input Control
 The USB Input Control window
lets you connect JMRI sensors and memories to USB input
devices on your computer. For example, you could have a JMRI
sensor go ACTIVE when when you type a key or press a joystick
button. You can then use Routes and
Logix to
use that USB input to control your layout.
The USB Input Control window
lets you connect JMRI sensors and memories to USB input
devices on your computer. For example, you could have a JMRI
sensor go ACTIVE when when you type a key or press a joystick
button. You can then use Routes and
Logix to
use that USB input to control your layout.
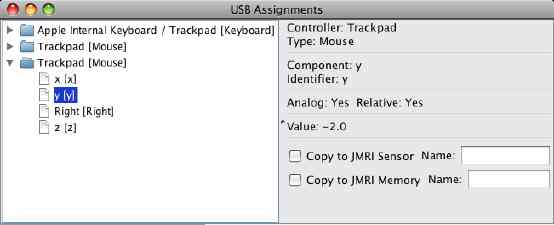
On the left side of the window is a tree displaying the available USB controllers and components within them. Depending on details of your computer, this tree might be completely populated when the window opens, or you might have to change the inputs (e.g. click a button) to have it show up. Devices that are plugged in after the program starts may or may not appear, depending on the specifics of your computer setup.
When you select a single component in the left-hand tree display, the right side pane will show you the details of that component and it's current value.
Below that is an area for configuring the program to drive a JMRI Sensor and/or Memory from the USB input. You can enter a Sensor name in the top text field, and then check the "Copy to JMRI Sensor" box. When the input goes On (for a digital input), or has a value greater than zero (for an analog input), the Sensor will be set to ACTIVE, and it will otherwise be set to INACTIVE. You can watch this work in the Sensor Table.
Note that you can't edit the sensor name while the box is checked; you have to uncheck the box so the Sensor stops following the USB input before changing to a new Sensor Name.
This feature was added on an experimental basis in JMRI 2.1.5. In that version, your configuration information isn't restored after you quit and restart the program. That will be added in the next JMRI version.
Thanks and congratulations to all who contributed!
Copyright © 1997 - 2018 JMRI Community.
JMRI®, DecoderPro®, PanelPro™, SignalPro™, TrainPro™, DispatcherPro™, OperationsPro™ and associated logos are our trademarks.
Additional information on copyright, trademarks and licenses is linked here.
Contact us via the JMRI users Groups.io group.
Site hosted by:
![]()
See also the site status page.