JMRI Code: Building with Eclipse
Eclipse (available at www.eclipse.org) can be used for working with JMRI. Due to the lack of integration between Ant (the primary JMRI build tool) and Eclipse, NetBeans is recommended unless you are already familiar with Eclipse.
Eclipse is a complex environment to work with. If you're already familiar with IDEs like Microsoft Visual Studio it won't be too hard to get used to, but it is definitely worth buying a textbook (e.g. The Java Developer's Guide to Eclipse).
JMRI developers use Git for source control. Source control using Git is including as part of the Eclipse "Oxygen" download. For more information or an alternate method for getting the JMRI source, see JMRI: Getting the Code.
These instructions were developed and tested using "Eclipse IDE for Java Developers" version "Oxygen Release (4.7.0)".
Note that you must also install the Java Development Kit (not included with Eclipse) to build JMRI with Eclipse.
If using versions of Eclipse older than "Mars", the M2Eclipse plugin must be installed in Eclipse.
Also note that at the time of writing this help document that JMRI requires Java version 8. You must confirm that JRE 8 is the default Java Runtime Environment. Eclipse recommends installing release "Luna" or later for Java 8, but there are workarounds described online.
Eclipse version "Proton"
The "Proton" version of Eclipse released in the summer of 2018 requires a Maven project update after downloading the JMRI source files. To do this, right click "jmri [...]" in the Package Explorer, then in the menu, select "Maven" and in the sub menu "Update project ...". After the update is complete, do a project clean to rebuild the source files.Getting the JMRI Source using Git
To get the source code from GitHub using Git you need to do the following:- Go to GitHub.com and create an account.
- Then open Eclipse.
- From the main menu bar select "File" then "Import..."
- Click on "Git" then "Project from Git" then the "Next" button.
- Now select the repository source by clicking on "Clone URI". The Source Git Repository screen should appear.
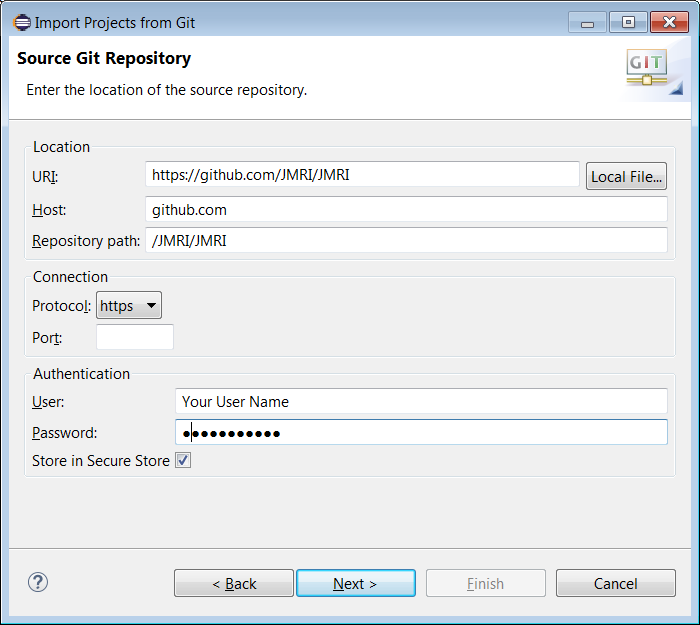
- Enter the URI "https://github.com/JMRI/JMRI".
- Enter your GitHub username and password in the authentication fields.
- Click the "Next" button and the Branch Selection screen should appear.
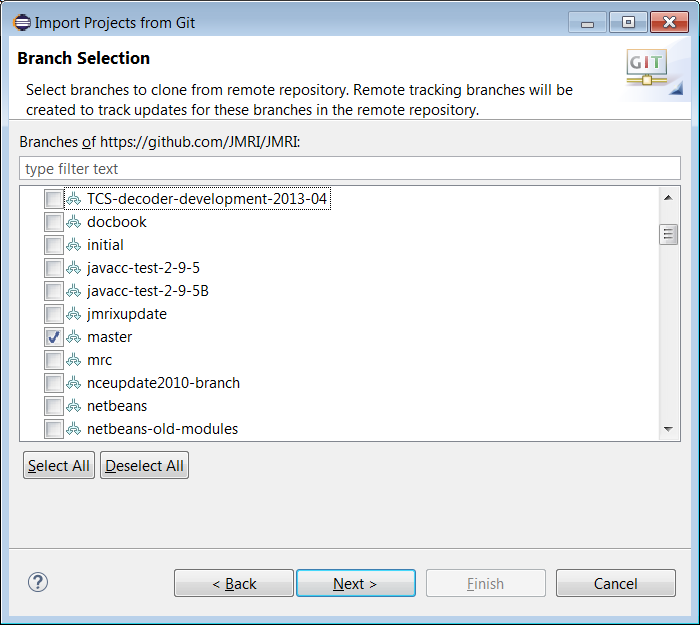
- Select the branches you want to install. If you're not sure which branches you need, select just the "master" branch. This branch contains the latest code for JMRI.
- Click the "Next" button and the Local Destination screen should appear.
- Press the "Next" button if the local destination is acceptable to you.
- The download will now happen. It might take a while.
- Next select the "Wizard for project import", use "Import existing Eclipse project" then "Next"
- Select "Finish" to complete the import.
After the import is complete the Eclipse Package Explorer should look like this:
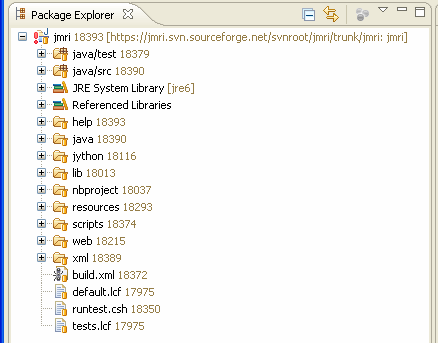
Note that the first build can take a while and will require Internet access.
If you get the error "Cannot read lifecycle mapping for artifact", open the "Run" menu, select "Run As", and then select "Maven generate-sources" to fix the error and start the first build.
To run an application do the following:
- From the "Run" menu, select "Run Configurations..."
- On the left side, expand "Maven Build".
- Select "JMRI DecoderPro" or "JMRI PanelPro".
- Optional, select the "Common" tab, the section on "Display in favorites menu", check the box next to "Run"
- Click "Run" to run the application. Eclipse will retain the build in the Run menu.
We also recommend that you deselect "Scrub output folders when cleaning projects" found under Window->Preferences->Java->Building->Output folder. This keeps the META-INT files in place after they are created by the Ant build.
Afterwards refresh the project, and then do a project clean. The clean should fire off a build and hopefully cleanup the errors.
Building and running JMRI using Ant
- Ant needs a JDK (Java Development Kit) in order to run the supplied "build.xml" file. The Eclipse download doesn't include a JDK, so you must download and install a JDK, and then configure ant to use the JDK.
- Here's a link to the Oracle site that can provide you with
a JDK:
http://www.oracle.com/technetwork/java/javase/downloads/index.html
- Select the build.xml file using the Package Explorer, then right click, and a menu should appear.
- Now select "Run As" then "2 Ant Build".
- Confirm under the menu tab "JRE" that you've selected a JDK, not a JRE.
- Now press the "Run" button, this should start the ant build.
If the ant build fails, most likely it is because you need a JDK
(Java Development Kit) rather than a JRE (Java Runtime Environment)
which is the default. To change the JRE, select "Run As" "2 Ant
Build" and a new window should appear. Select the "JRE" tab. The
change the JRE, select the "Separate JRE:" radio button, and then
press the "Installed JREs" button. If you don't see a JDK, you need
to add one (from site above).
A new JMRI checkout should
build cleanly. If not, please check with the JMRIusers or
jmri-developers mailings lists for help.
If the ant build succeeds, you can now launch any of the JMRI applications from ant, and create a jmri.jar file if you wish. Use the "2 Ant Build" and in the window select the "Targets" tab, and use the appropriate checkbox to generate what you want.
Pushing changes to your GitHub branch
The standard practice for getting your changes included in main JMRI code repository is to commit them to your local repository periodically, then when ready to publish "push" an entire set of changes to a repository belonging to you on GitHub, and then finally making a request for somebody to "pull" your changes into the main JMRI repository. See JMRI: Git FAQ "Setting up a Git environment for JMRI Developers" for more information.
It is also good practice to "pull" all of the recent changes from the main JMRI repository before performing your commits. After a "pull" your workspace and eventually your remote GitHub repository will be in synch with the main JMRI repository. To perform a "pull" select your project, then "Team" then "Pull" from the menu.
If you want to see which files are going to be modified before the "Pull", you can use the "Team Synchronizing" feature. To do so, right click on your project, the "Team" then "Synchronize Workspace"
Pushing to your GitHub branch:
- First, commit your changes to the local repository on your
computer
To commit a set of changes, right click on the project that you want to commit, and select "Team" followed by "Commit". Enter a commit message and select the files you wish to commit.
- Next, "push" a set of changes from your local repository to
your repository on GitHub. (You do this so others can access it and
pick it up for inclusion into JMRI)
Before you can push your changes to GitHub for the first time, you'll have to create your own GitHub repository (which you may have done above) and "fork" the JMRI repository. Log on to your account at GitHub.com and then navigate to the JMRI repository https://github.com/JMRI/JMRI In the upper right hand corner of the page you will find a button labeled "Fork". Press the "Fork" button to create your own repository of the JMRI source.
To push to your GitHub repository, again select "Team" then "Remote" then "Configure Push to Upstream". In the "Configure Push" window, click on the "Push URIs" and then the "Add" button. In the "New URI" window enter the URL of your GitHub repository along with your username and password. After pressing "Finish" the "Configure Push" window should look like the image below:

Press either the "Save and Push" or the "Save" button. Later when you want to push new changes to your repository on GitHub, you can simply commit them as described above, and then use the "Push" icon in the Synchronize window.
- Finally, submit a "Pull Request" to the main JMRI code
repository on the GitHub website.
To do this, start by signing on to the GitHub web site, selecting your repository and clicking the Pull Request button. For more info, see the developer instructions,
Compiler Errors and Warnings
As of 10/18/2017 roughly 4300 warnings were being reported by the Eclipse. You can ignore these for now.Thanks and congratulations to all who contributed!
Copyright © 1997 - 2018 JMRI Community.
JMRI®, DecoderPro®, PanelPro™, SignalPro™, TrainPro™, DispatcherPro™, OperationsPro™ and associated logos are our trademarks.
Additional information on copyright, trademarks and licenses is linked here.
Contact us via the JMRI users Groups.io group.
Site hosted by:
![]()
See also the site status page.