JMRI Code: Building with IntelliJ IDEA
IntelliJ IDEA Community Edition (available from www.jetbrains.com/idea/) makes a great platform for working with JMRI and Java on OS X, Windows and *nix.
JMRI developers use Git for source control. Source control using Git is including as part of the IntelliJ IDEA download. For more information for getting the JMRI source, see JMRI: Getting the Code.
These instructions were developed and tested using IntelliJ IDEA 15 and 16 Community Edition (free).
Installing IntelliJ IDEA
Preparations
- Go to GitHub.com and create an account.
- In GitHub web, go to the JMRI/JMRI repo and "Fork" the JMRI repository to your own remote copy. To do this, log on to your account at GitHub.com and navigate to the JMRI repository https://github.com/JMRI/JMRI In the upper right hand corner of the page you will find a button labeled "Fork". Press the "Fork" button to create your own repository of the JMRI source. (see Getting the Code).
After downloading and running the installer for your OS,
configure the IntelliJ application as follows:
Set vmoptions
On OS X
- Open IntelliJ
- From the Help menu, select "Edit Custom VM
Options":
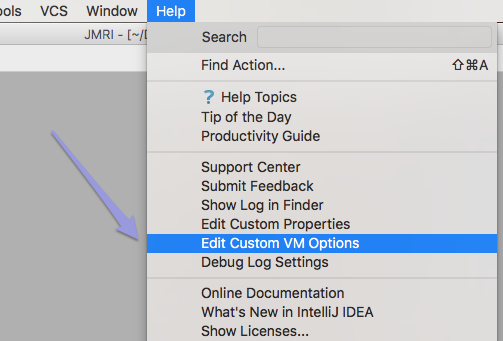
- In the dialog, answer "Yes" to create a copy of the
application's vmoptions file:

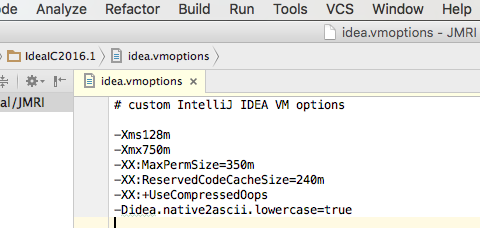
- Add the line "-Didea.native2ascii.lowercase=true" to
the contents of this file and select Save All from the File
menu:
- IntelliJ 2016 and up are now ready to use for development with
JMRI. The vmoptions file is store in
˜/Users/Preferences/IdeaIC2016.1/
But in version 15, IntelliJ on OS X did not correctly name this vmoptions file ( read more).
To correct this, close IntelliJ 15 and in Finder go to the˜/Library/Preferences/IdeaIC15/folder.
Rename the newly created fileidea64.vmoptionstoidea.vmoptions(effectively removing the "64" part).
On Windows and *nix
- From the Help menu, select "Edit Custom VM Options".
- Add the line "-Didea.native2ascii.lowercase=true" to
the contents of this file and select Save All from the File
menu.
It will be saved into the location under user home. That's$HOME/.IdeaICXX/idea$BITS.vmoptionsfor *nix and%USERPROFILE%\.IdeaICXX\idea%BITS%.exe.vmoptionsfor Windows (XX = the version number, BITS = the chip version installed).
If the IDEA_VM_OPTIONS environment variable is defined, or a *.vmoptions file exists, then this file is used instead of the file located in the IntelliJ IDEA installation folder.
More info on setting these important vmoptions is
available on the
Idea web site.
Note: If you have a hint how to set this at the Project level
instead of tinkering with local application settings, please
tell JMRI
users at Groups.io.
Set Preferences
Start IntelliJ and choose "Preferences" from the application menu (OS X) or Edit menu (Win).
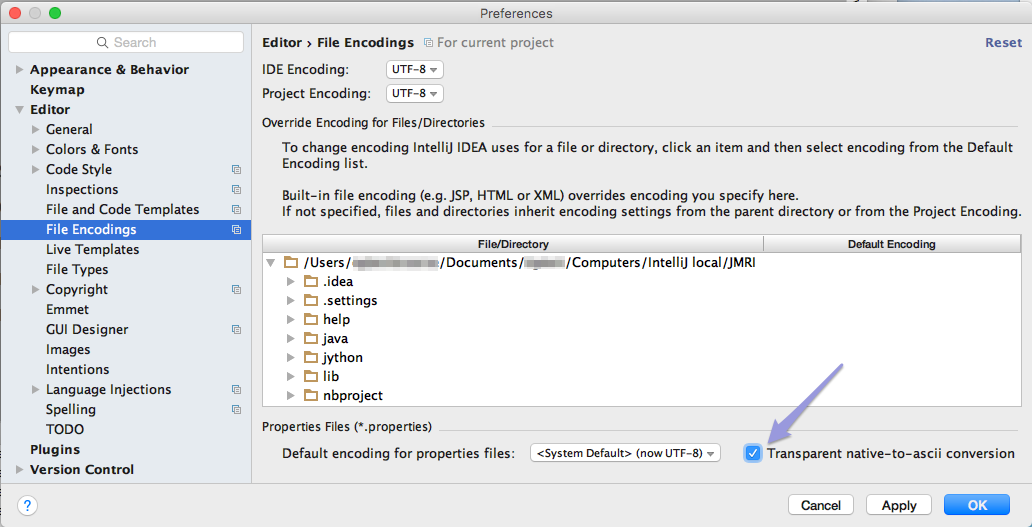
- From the Editor -> File Encodings tab, check
"Transparent native-to-ascii conversion":
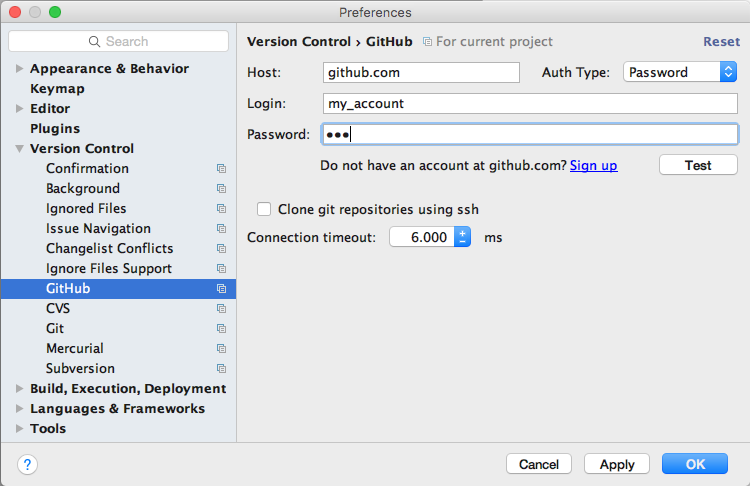
- From the Version Control -> GitHub tab, enter
"github.com" as the Host and enter your Login
credentials:
- From the Build, Execution, Deployment -> Java
Compiler tab, select "1.8" as the Project bytecode
version:
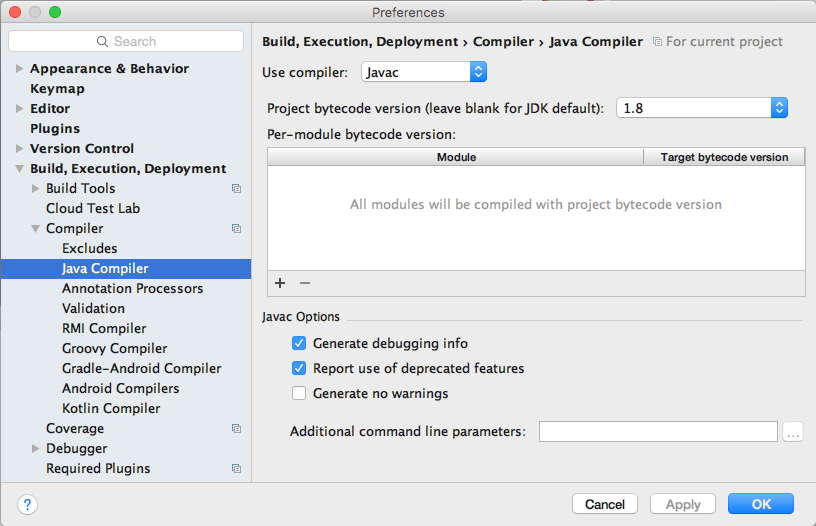
- Click OK to close the Preferences.
Getting the JMRI Source using Git
To get the source code from GitHub into IntelliJ, follow these steps:
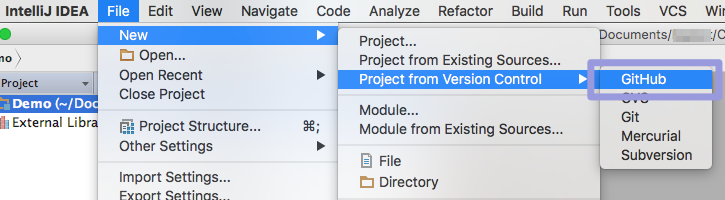
- Open IntelliJ.
- From the main menu bar select File -> New ->
Project from Version Control -> GitHub
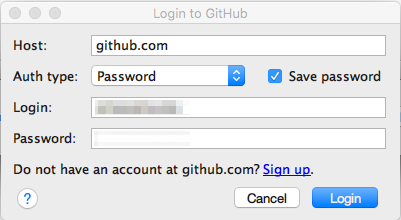
- If prompted, enter your GitHub username (Login) and
Password in the authentication fields and click
"Login":
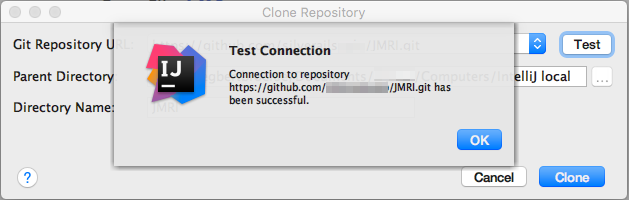
- The Clone Repository pane should now appear. Select a
Git Repository URL from your account and point to your
local repo folder as "Parent Directory":
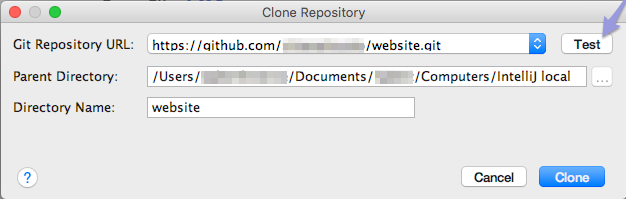
Optionally click "Test" at top right to check your connection:
- Click "Clone" and follow progress in the indicator at
the bottom of the Project window:

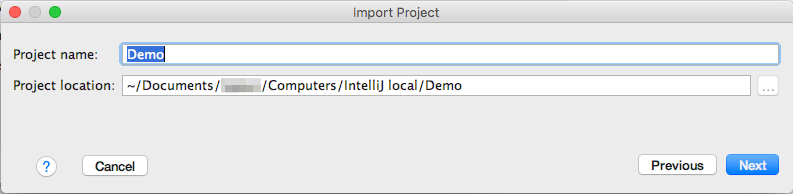
- In the pane that opens after download is complete,
check the location on disk,
confirm the project name (like the original i.e. "JMRI") and click "Next":
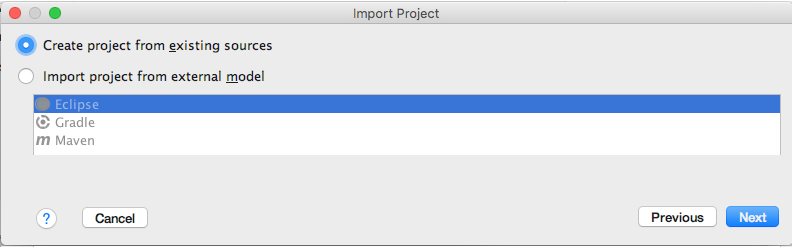
- Select "Create project from existing sources" and click
"Next" again:
- Click "Mark all" and then "Finish":
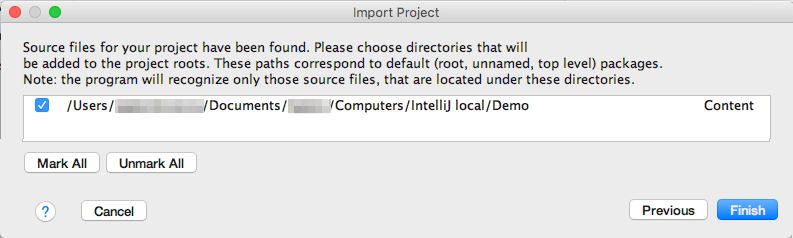
This will add JMRI to the IntelliJ Project window.
The Project window
After cloning is completed, the IntelliJ Project window
should look like this (OS X example):
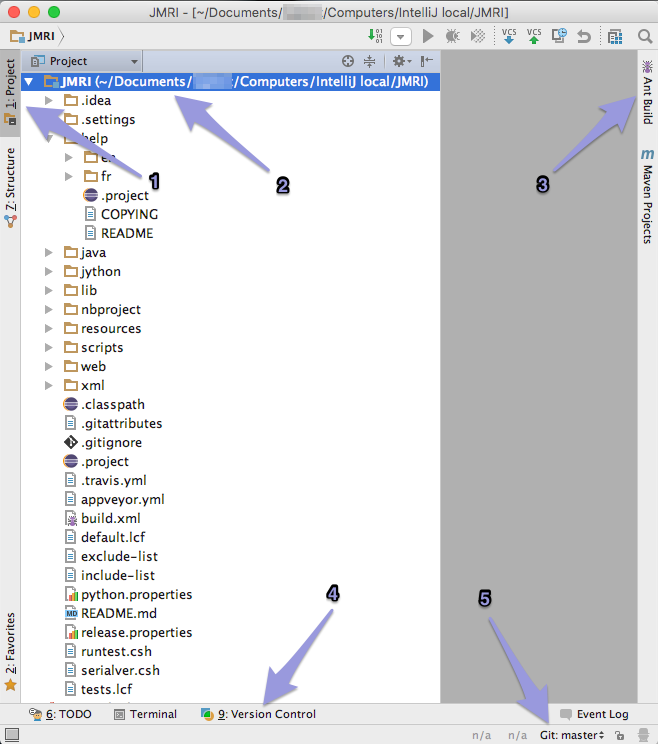
Along the edges of the window are several groups of tools, often used are:
- the Project tab on the left
- the JMRI directory in the left half
- the Ant Build tab on the right and
- the Version Control tab at the bottom.
- the Git: master at the bottom righthand corner, showing the current Branch ("master") with a menu to change to another Branch.
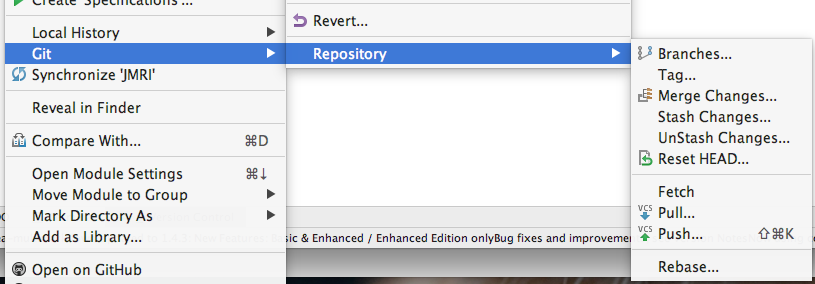
You can also access this panel from the main VCS -> Git
-> Branches... menu or right clicking the JMRI Project
folder and selecting Git -> Repository ->
Branches...
To check out another Branch from the remote repo, select
its name under "Remote Branches", right click and select
"Checkout as new local branch":

When the information from the new Branch is downloaded,
the Message Center will confirm:

Making Changes
To work on the JMRI code, always start a new Branch, so
your own "master" will stay intact.
To create a new Branch in IntelliJ, from the Git
Branches pane, select "New Branch":
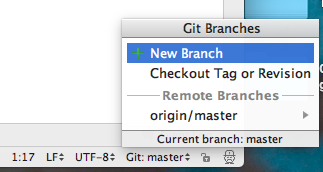
Supply a name i.e. my-dialog-2 and click OK.
Note: Starting your Branch name with a unique two letter
combination will make it stand out from the long list much
better than a name like patch-1.
Building and running JMRI using Ant
We recommend that before you try to build and run one of
the applications within IntelliJ, you run the Ant Build ->
<Default target> first. This will create the necessary
working directories, load some resource icons, and create
needed Java files. To run the ant build.xml do
the following:
- Ant needs a JDK (Java Development Kit) in order to run
the supplied "build.xml" file. The IntelliJ IDEA 15
download comes with a JDK, but you have to configure ant to
use the right JDK.
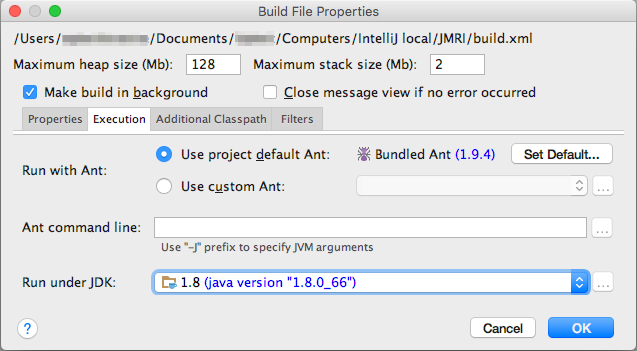
To verify the JDK is set to java 1.8, open the Ant Build tab [1], click a file in the Ant Build list [3] and select the Properties button [2] at the top right of the pane:
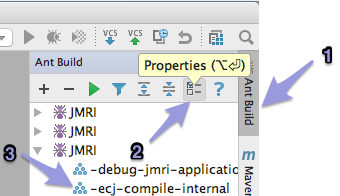
- Select 1.8 as "Run under JDK" if not
yet set:
Click "OK" and save your JMRI Project (Cmd-S/Ctrl-S). - Select the <Default target> file in the Ant Build list, right click, and select "Run", or click the green triangle "Run" button at the top of the pane. This should start the ant build. Follow any messages in the Event Log that pops up from the bottom edge of the Project window.
- A new JMRI checkout should build cleanly. If not, please check with the JMRIusers or jmri-developers mailings lists for help.
If the ant build is successful, you can launch any of the JMRI applications from the Ant Build tab.
Building and running JMRI using IntelliJ
To run an application, either:
- From the main menubar open the "Build" menu and select
a JMRI package like
panelproor - open the Ant Build tab and from the "Ant Build" list,
right click the desired package i.e.
decoderproand select "Run Target".
Note: The first two "JMRI" sets will build the English and French JHelpDev TOC & Index files respectively. Hover your mouse over them and read the tooltip to learn which is which.
The Message Center Console will list all steps of the build process, after which a Java icon will open with the application running including all your new edits.
Pushing changes to your GitHub branch
The standard practice for getting your changes included in
the main JMRI code repository is to Commit them to your local
repository periodically and, when ready to publish
everything, "Push" an entire set of Commits to your own
remote repository on GitHub, and finally make a Pull Request
for the maintainers to "Pull" your changes into the main JMRI
repository.
When working on more than one computer or different IDEs,
Committing and Pushing makes your new edit available on the
other computers.
See the JMRI: Git FAQ "Setting up
a Git environment for JMRI Developers" for more
information.
Pulling
It is also good practice to "Pull" all of the recent changes from the main JMRI repository before performing your Commits. After a "pull" your workspace and eventually your remote GitHub repository will be in synch with the main JMRI repository and you will see recent work by others. To perform a "Pull":
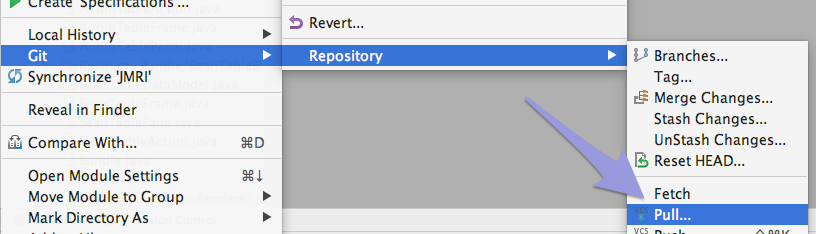
- Select your project i.e. JMRI in the
Project tab, right click and select "Git" ->
"Repository" -> "Pull..." from the context menu:
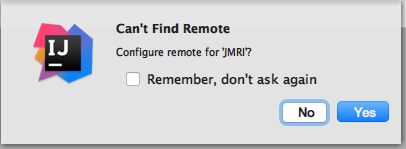
or from the VCS menu select "Git" -> "Pull..." - You may be asked first to confirm the origin of your
remote repo, in our case "JMRI/JMRI":
- The Pull Changes dialog opens:
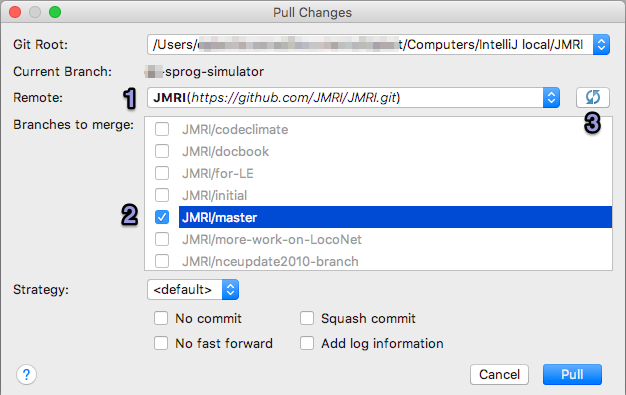
[1] Select a remote repository (depending on the way you want to manage that, either your own repo or JMRI's as in the example).
[2] From the displayed list, select the appropriate Branch to merge (you might also Pull an extra Branch to switch to later).
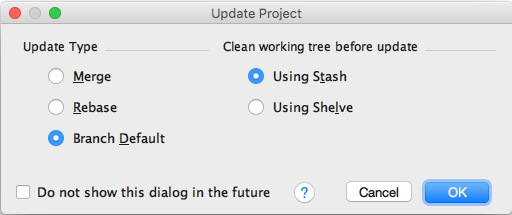
If what you expect is not in the list, click the Refres button [3]. - To conclude, click "Pull" and answer how you would like
to combine the new data into the existing local repo:
Pushing
Pushing to your GitHub Branch:
- First, commit your changes to the local repository on
your computer.
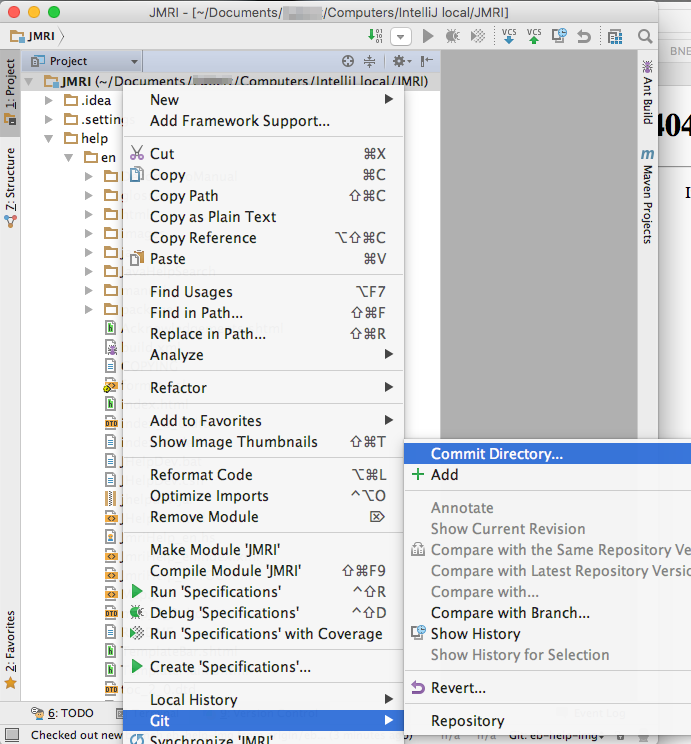
To commit a set of changes, choose "Save All" from the Edit menu, select your project i.e. JMRI in the Project tab, right click and select "Git" -> "Commit Directory..." from the context menu:
- In the Commit Changes pane, enter a Commit Message [1]
describing your changes/fix (line 1 will be used as the
short title, add more detail from line 2).
Select the files [2] you wish to commit and deselect files you don't.
Choose your name from the list as Author [3]:
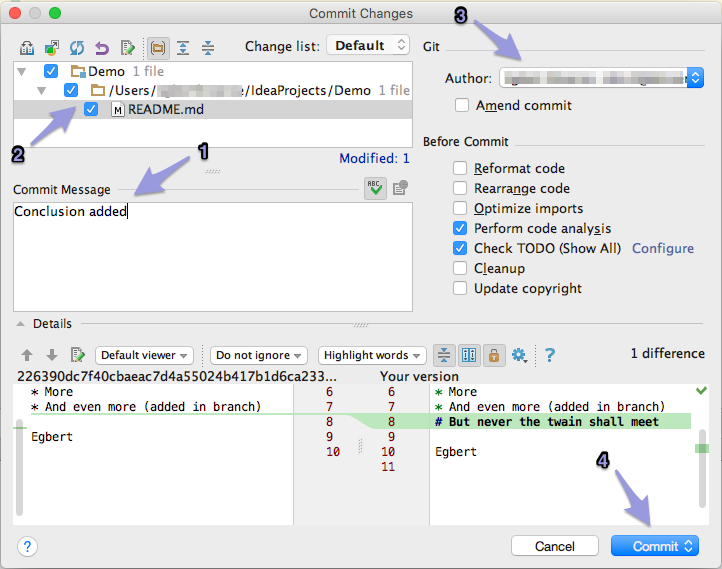
- Click the "Commit" button [4] to add your saved edits to the local GitHub Branch...
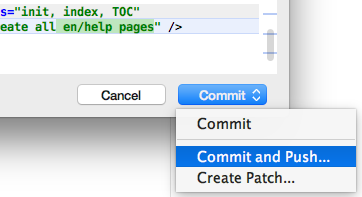
- Or hover over the Commit button and choose "Commit and
Push..." to continue to Push this set of changes from your
local repository to your remote repository on GitHub right
after the Commit (so others can access it and study it for
inclusion into JMRI).
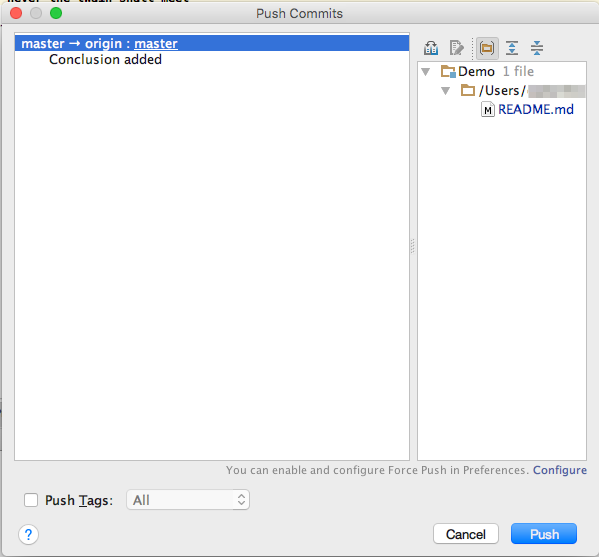
- In the Push Commits pane, review your description and click "Push".
- To push to your GitHub repository after a local Commit,
just select "Push..." from the "VCS" -> Git menu:
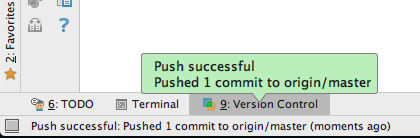
- If this went fine, a confirmation will appear at bottom
left over the Version Control tab:
Before you can Push your changes to GitHub for the first time, you'll have to create your own GitHub repository (which you have already done in step 1).
Debugging
We've documented the following steps to help you get started. (Note that step 4. as yet is not complete. When you know what to enter as the Main Class Path, please report on JMRI Users)
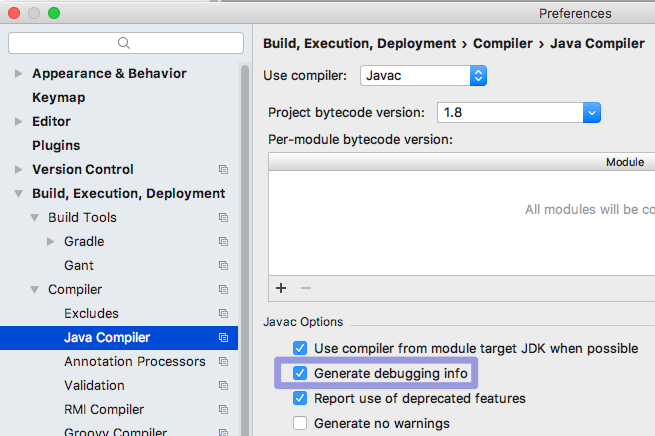
- In IntelliJ, start by opening Preferences > Build, Execution, Deployment
and check "Generate debugging info":
- Then, doubleclick "jar-resources" in the Build tab to have IntelliJ build afresh .jar Java archive to use for our debugging.
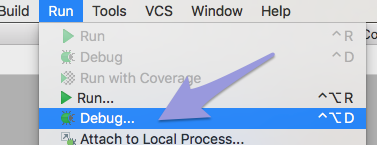
- When that has run, choose "Debug..." from the Run menu.
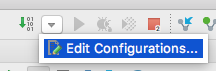
On the small "Debug" pane that appears, click "Edit Configurations..."
Alternatively, on the top right, click on the downward triangle "Select Run/Debug Configuration" button and select the "Edit Configurations..." option from there:
- On the top left of the new pane that appears, click the + sign (Add New Configuration).
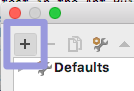
Or simply type Command + N.
Select "JAR Application" in the list. - This opens the "Run/Debug Configurations" pane:
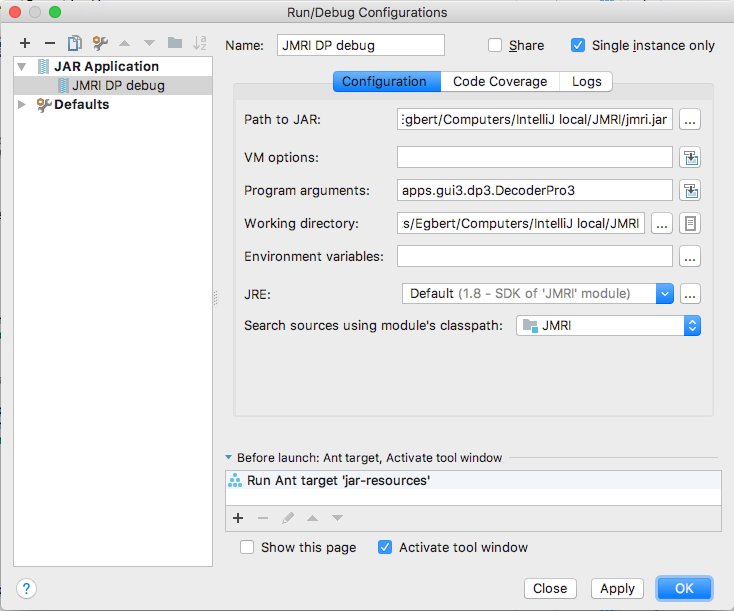
- As the Name of this Configuration, enter "JMRI DP debug".
- Make sure "Build" is visible in the "Before launch:" table, select "Run Ant target" and choose "jar-resources" from the build.xml list
- Check "Activate tool window" near the bottom of the pane.
- Enter "jmri.jar" as the "Path to JAR" or use the "..." button to navigate to the freshly built jmri.jar in your Project.
- Make sure the prefilled "Working directory:" is showing your local path to JMRI (see example).
Set "Default" as the "JRE:" choice. - Select "JMRI" using the "Search sources using module's classpath:" drop down.
- Click "OK" to complete the configuration setup.
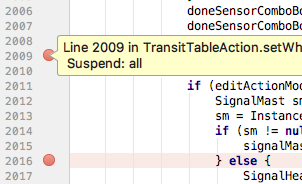
- To run your first debug session, start by opening a .java file and setting a Breakpoint on a line in your
code by clicking in the left margin of the central edit pane:
- We're now ready to start a Debug session by clicking the Bug button at the top right, making sure our
"JMRI debug" configuration is selected in the drop down to the left of it:

- After a short while, at the bottom of the main IntelliJ IDE interface, the Debug pane appears, stopping
just before your Breakpoint (or some previous error):
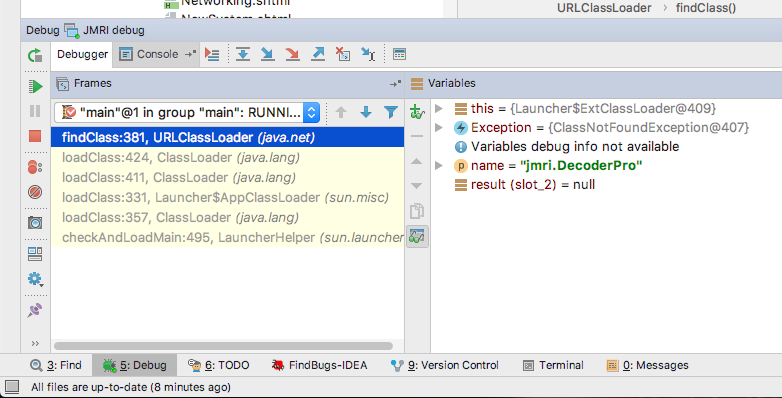
- Inspect the current values of the active variables, and click the Step Into button to execute 1 line of
code:

A further explanation of this pane and debugging in general can be found in the
IntelliJ Help.
If your code has not been compiled before debugging, the source and class files might be out of sync, so be
sure to build first. You could add that to your Debug Configuration too.
Tricks
Edit .properties files
Make sure you have set up IntelliJ to
convert special characters using lower case
encoding strings, as only then will your changes be accepted
for merging into JMRI.
The - not trivial - instructions to set this via
vmoptions are at the top of
this page.
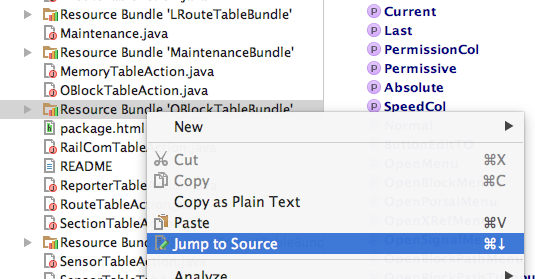
To easily edit Resource Bundle .properties files,
containing translations in different languages, right-click
on one of these (closed) folders in the Project file list and
select "Jump to Source":
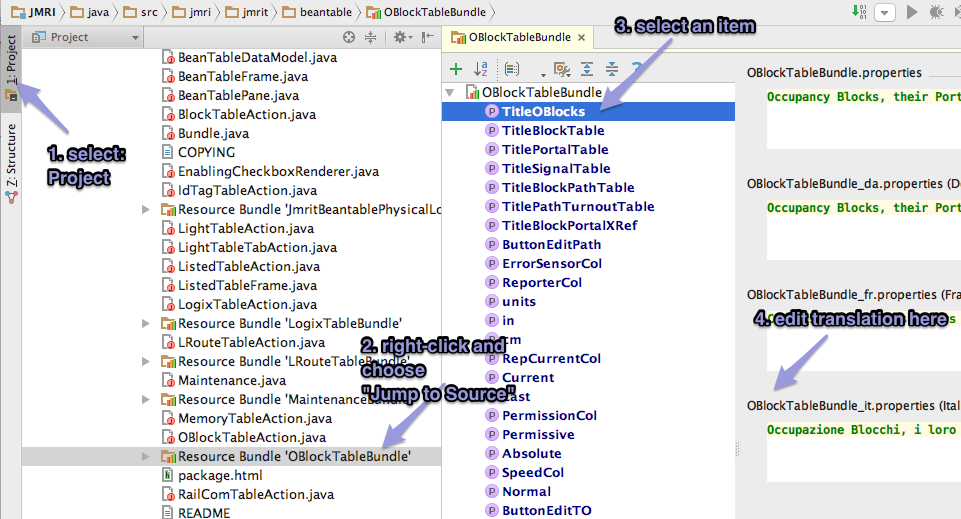
This will open a window with a list of coded keywords on
the left and a text box for every translation to the
right:
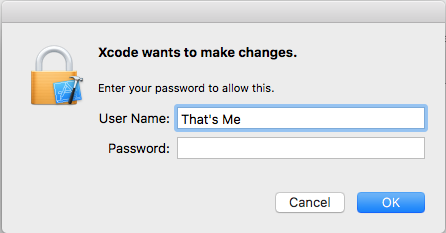
Error: Can't start Git
On macOS, when you run into this error, usually when starting IntelliJ for the
first time after a system update:

- Quit and restart IntelliJ
- If that does not fix it, quit IntelliJ and start the Apple Xcode application.
By this you be asked to agree with the licence agreement, and that will reenable the Git installation to be used inside IntelliJ too.
Reset HEAD
When in testing your app you conclude that you would like
to remove your last couple of Commits, IntelliJ gives you the
option to graphically Reset your HEAD.
To do this, open the "Version Control" -> "Log" tab at the
lower left of the Project window to view a "Track Plan" of
the history of your Branch, all the way back to the different
parts that made JMRI:
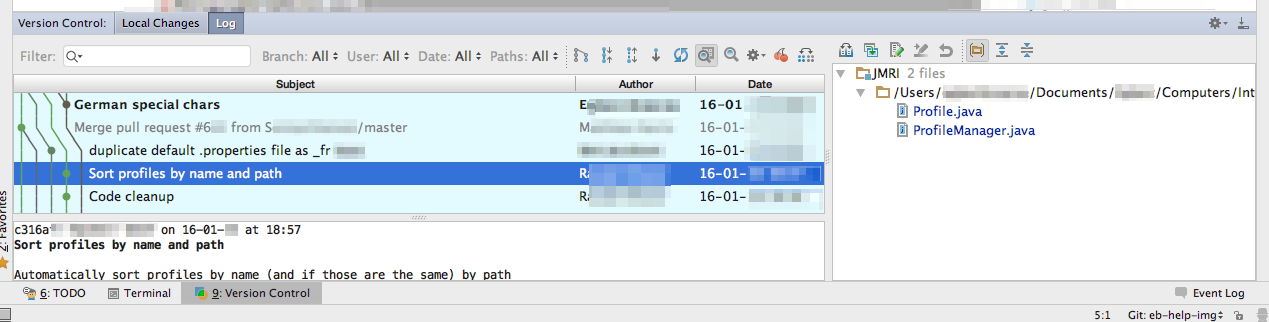
Click on any line to view the changes that were Committed
at that point in time (listed to the right).
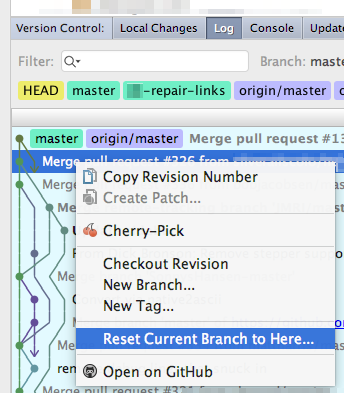
To reset your repo (HEAD) back to a certain point, right
click on the corresponding line and select "Reset Current
Branch to Here...".
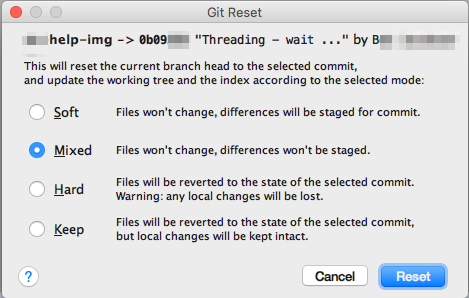
Confirm the way you want to save or discard your Commits
after that point in the dialog:
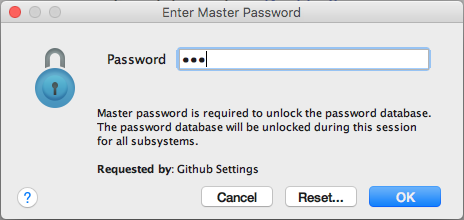
Master password
To securely store your GitHub login, you might
periodically be asked to unlock it:
Make a Pull Request
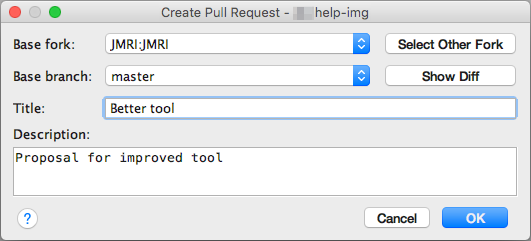
Finally, when ready, submit a "Pull Request" to the main JMRI code repository on the GitHub website so the maintainers of JMRI can study your proposed changes and merge them into the master JMRI repo.
To make a PR from within IntelliJ IDEA, select "Create
Pull Request" from the "VCS" -> Git menu (that's the last
item, supported by the Git plug in).
To Make a PR from GitHub web - outside IntelliJ - start by signing on to the GitHub web site, selecting your repository & branch and clicking the Pull Request button. For more info, see the Git Developer Help page.
Testing with IntelliJ
When you create or edit a test
(located in your Project at JMRI.java.test etc.) you can
test it either as part of the alltest Ant Build
(double click its name in the IntelliJ Ant Build right hand
column to run) or run it on its own using test-single.
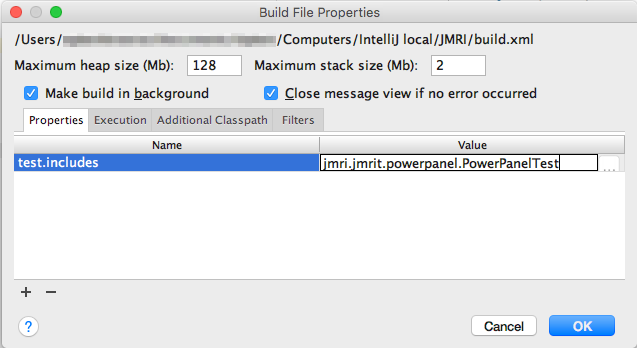
In the latter case, enter the name of your test in the Ant Build
Properties by either clicking the Properties button at the top or
right-clicking on any line in the Ant Build column,
choosing "Properties". Open the "Properties" tab, click the
+ (Add) sign at lower left and enter "test.includes"
in the Name column and the path to your test under Value,
starting with either apps. or jmri. as shown:
More Help
See the IntelliJ IDEA web reference and other resources for more information on using this IDE.
Thanks and congratulations to all who contributed!
Copyright © 1997 - 2018 JMRI Community.
JMRI®, DecoderPro®, PanelPro™, SignalPro™, TrainPro™, DispatcherPro™, OperationsPro™ and associated logos are our trademarks.
Additional information on copyright, trademarks and licenses is linked here.
Contact us via the JMRI users Groups.io group.
Site hosted by:
![]()
See also the site status page.