JMRI: DecoderPro User Guide
Rosters

Reading the contents of a decoder generally takes a long time, and with some command stations it's not even possible. The JMRI Roster stores the known values of decoder configuration values to make it unnecessary to read them from the decoder. It can contain "Roster entries" for an unlimited number of individual locomotives.
Each Roster entry has an "identifier" (Roster ID) by which it's known. This is your name it. When the program wants you to select a Roster entry, it will ask you to pick from a selection box or menu containing Roster entry IDs. You can use anything you want for this: Road number, type, even "That crummy old model I need to repaint" or "My beautiful Shay".
You can edit the contents of a Roster entry with the programmer panes.
Roster Entry
When you first open a JMRI programmer, you'll see a
"Create New Loco" pane (pictured to the right).
On it is displayed:
- Roster ID
- Your name for the new locomotive, see above. You can change an entry's ID later, in which case it will appear in new selection boxes, etc, with the new ID name.
- DCC Address
- This is either a Short or Long Address, based on how the decoder is configured.
- Buttons
- To Read the information from a decoder with this address, Write changes to that decoder or only Save this entry to disk.
Click the "Open Comprehensive Programmer" button at lower right to display a row of tabbed panes with additional properties:
- Roster Entry
-
- Road Name
- Road Number
- Manufacturer
- Model
- Owner
- Comment
Use these fields for whatever you want. - Decoder Family
- Decoder Model
These two fields are filled in based on the decoder that was selected when the entry was created. They can't be edited after that. - Decoder Comment
You can put anything you want here. Some people have used it to record whether an NMRA plug was used, whether the decoder was soldered in, etc.
- Basic
- With additional information about your Locomotive etc.
- Motor, Basic Speed Control, and many other tabs:

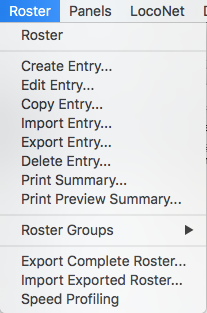
The Roster Menu
 The JMRI application
main windows and the DecoderPro windows have a "Roster" menu
available. That menu allows you to manage the entries in your
Roster with commands:
The JMRI application
main windows and the DecoderPro windows have a "Roster" menu
available. That menu allows you to manage the entries in your
Roster with commands:
- Create Entry ...
- "Create" is used to create a new Roster entry, even if you don't currently have a connection to a layout. When you select this, you're given a window in which to select a decoder type. Pick the right decoder type, the format you want, and click "Open". You'll see a DecoderPro-style window for changing the contents of the new entry. Don't forget to click "Save" when you're done!
- Edit Entry ...
- "Edit" is used to update the contents of a Roster entry, even when you don't have a layout connection (normally, if you do have a layout connection, you'll use the DecoderPro programming functions). When you select this, you'll get a window in which to select an existing Roster entry, a format, and an "Open" button. Once you click "Open", you'll get a DecoderPro-style window for viewing and changing the contents of the entry. Don't forget to click "Save" when you're done!
- Copy Entry ...
- "Copy" is used to create another Roster entry that's identical to the original except for it's ID. If you have a standard setup you'd like to use for new locomotives, you can create a Roster entry with all the right values filled in, and then copy it every time you want to program a new locomotive.
- Export Entry ...
-
Although it is possible to find the XML files defining
Roster entries in the preferences directory, it's better
not to mess with them directly. The "Export" command will
create a new file representing a Roster entry, including
all of the comments, CV values, etc. You can then take
that to another copy of DecoderPro and import it into
that Roster. Export does not change your current Roster
in any way, it just makes a copy for you of a specific
entry.
When you select "Export ...", you be asked to select the Roster entry you want to export, then you'll be prompted to select a new filename. You can call it anything you want, but it's best to put a ".xml" extension on the name.
- Import Entry ...
-
The combination of "Export" then "Import" allows you to
bring a locomotives Roster entry when you move to another
layout, with it's own DecoderPro installation.
When you select "Import ...", you'll be asked to locate an XML file to import. It should have been created by an "Export" command. You'll also be asked for the ID of the new Roster entry to be created. This can be the same as it was before it was exported, or you can give it a new ID.
- Delete Entry ...
- This completely removes a Roster entry. You're asked if you're sure and a backup is made, in case of mistakes.
- Print Summary ...
-
This prints a summary of the entire Roster, listing the
primary information for each entry.
For a more detailed listing of a specific decoder, see the "File" menu on the programmer screens.
- Print Preview Summary ...
- This shows the contents of the printed summary on your screen, so you can preview it before printing.
Thanks and congratulations to all who contributed!
Copyright © 1997 - 2018 JMRI Community.
JMRI®, DecoderPro®, PanelPro™, SignalPro™, TrainPro™, DispatcherPro™, OperationsPro™ and associated logos are our trademarks.
Additional information on copyright, trademarks and licenses is linked here.
Contact us via the JMRI users Groups.io group.
Site hosted by:
![]()
See also the site status page.