JMRI: Creating Control Panels
The JMRI libraries contain a system for creating control panels. It's highly customizable, and allows you to control the railroad from the panel directly.Contents of a panel
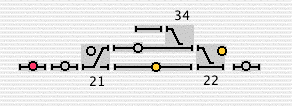
Clicking on a turnout symbol flips it from closed to thrown and vice-versa. A turnout also has "unknown" and "inconsistent" states, represented by an icon with a question mark and X respectively. These represent a state where no information has been received, and where the information is internally inconsistent (e.g. both closed and thrown at the same time).
"Sensors" can be used to represent occupancy indicators or other inputs. The default icon is a small circle, with color used to represent the state of the sensor. In the example above there are seven sensors being driven by occupancy indicators. Clicking on a sensor causes the sensor to alternate between "active" and "inactive" states. With the default icons, active is a green circle and inactive is an empty circle. These are meant to represent a lit/dark panel indicator. A red circle represents the "unknown" state, used when no information has yet been received from the layout.
Creating a panel
(Nick Kulp presented a nice clinic on this topic during March 2004; his slides are available on the main JMRI web site. Dick Bronson has provided several animated introductions to PanelPro on his own web pages.Panels are made with a "Panel Editor", which allows you to place images to represent turnouts, sensors (on some systems) and trackwork.
You start the editor by selecting "New Panel...", then
"Panel Editor" from the "Panels" menu on the main window.
You'll get a blank control panel, plus the editor window:
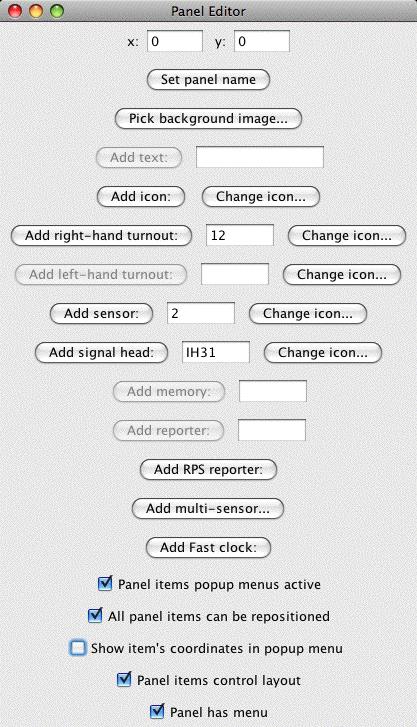
- Two text fields specifying where (in pixels) new components will be inserted on the panel. You can generally ignore these, as once the components has been inserted you can drag it around by holding the meta (Apple, command, etc) key down.
- A button to pick a background image. The editor's drawing capability is rudimentary and likely to stay that way for a long time. To create CTC panels, complex track diagrams, etc, its easier to draw them in some other program and insert them as the background image for a JMRI control panel.
- A button to add a text label. Put the desired text in the field and click the button. You can slide the label around after inserting it, but you currently can't edit the text later.
- A button to add an icon as a label. This is a way to add track symbols, etc. To see or select the icon, click on the "Edit icon..." button.
- Two sections for adding left- and right-bound turnouts. These actually work the same way, only with different icons to represent the states of the turnouts. Enter the turnout number (e.g. 23) and click "Add turnout:". If you'd prefer a different graphic for the closed and thrown states, you can change their icons with the "Edit icon..." button.
- A section for adding a sensor. Type the sensor number (e.g. 74 or LS74) in the field and click "Add sensor:".
- A section for adding a signal head. Type the signal head number in the field and click "Add sensor:".
Each of these also has a "Edit icons..." button, which allows you to select which icons will be shown for the turnout, sensor, etc that you are about to add.
After getting the panel the way you want, you can use the "Store panel..." entry in the "Panels" menu to write it to an XML file.
Icons
The Panel Editor is icon based. The JMRI library contains lots of contributed icons for representing CTC panels, LEDs, etc. You can browse through them with the tree in the bottom of the editor frame. Perhaps the best way to see what each looks like is to select it in the tree, then click on the icon next to the "Add icon" button. That will load it.For little bits of track, e.g. to connect turnouts, you might want
resources -> icons -> small schematics ->tracksegmentsthen block.gif, etc.
We do need to do a better job of organizing those...
Other types of panels
Because Panel Editor is icon-based, you can create panels that look any way you want. For example, instead of using track-schematic icons for turnouts, you could use small images of the levers and plates on CTC machine. This would give you "mechanical" levers you can flip back and forth with a click.To make this really easy, we need to have a better editor. And making a "real" CTC panel will require better signal logic to handle the code buttons, etc. If you've got opinions on how this should work, please send comments!
Using the panel
To command a turnout to change state (e.g. closed to thrown), click on it.To move it around, you "meta-drag" it. On a Mac, that's "hold the cmd key and drag with the cursor"; on windows, it might be the Windows or control key. Or it might be a right-drag. Sorry, I don't have a Windows machine here to figure it out.
There's also a pop-up menu (ctrl-click on a Mac) that will let you rotate the icon so that it points in whatever direction you want.
Thanks and congratulations to all who contributed!
Copyright © 1997 - 2018 JMRI Community.
JMRI®, DecoderPro®, PanelPro™, SignalPro™, TrainPro™, DispatcherPro™, OperationsPro™ and associated logos are our trademarks.
Additional information on copyright, trademarks and licenses is linked here.
Contact us via the JMRI users Groups.io group.
Site hosted by:
![]()
See also the site status page.