Using the Throttle Pane
Basic structure of a Throttle Window
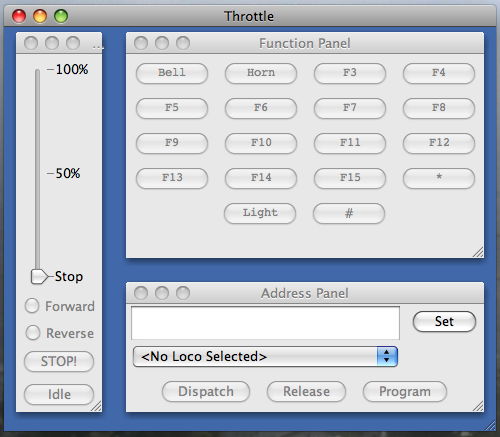
There are three panels (or sub-windows) associated with each Throttle window. These are identified as:- Control Panel - contains a throttle slider to control the speed of the loco, a forward and reverse selector, an Emergency Stop action button, and an Idle action button (mostly used for sound equipped decoders).
- Function Panel - is used to associate the function buttons with the active output functions of the decoder.
- Address Panel - is used to identify the decoder's address, and to dispatch or release the identified address.
For details about usage of the Throttle window menus, see there.
For details about usage of the Throttle window toolbar, see there.
For details about usage of the Throttles Preferences, see there.
For advanced control of a Throttle, see there.
Address Panel - Assign a Decoder Address to a Throttle
The first thing that needs to happen before any options or buttons in the window become active, is to assign a decoder's address in the "Address Panel". There are two ways that this can be accomplished.Manually enter the decoder's address in the large text box or select an existing Roster entry though the drop down menu, then click on the "Set" button.
When manually entering an address, be sure to click on the Set button. Without this step, all throttle actions remain disabled.
Note that there is an option in the Throttles Preferences Pane that will enable an automatic look back in the roster DB when an address is entered, and eventually trigger an automatic set up of the full throttle if any matching Roster entry is found.
After an address is selected, all other controls and options in the throttle window will be enabled:
- Dispatch - releases the decoder address back to the command station in a "dispatch" mode. Usually, only one address can be in dispatch state at the command station - all others are either "in use" or "idle" (released). The controls and options in the throttle window will become disabled until another address is "Set".
- Release - releases the decoder address back to the command station as "no longer needed". The controls and options in the throttle window will become disabled until another address is "Set".
- Program - opens an ops-mode (programming on the main) DecoderPro programmer for the selected locomotive. It's only active when a roster entry has been selected on the throttle.
Control Panel - Let's Run a Train
Now that you have established an address for the throttle, you should be able to run the train on your layout (if your layout is active and the address you entered is valid to a locomotive on the track). You do this using the "Control Panel".- The slider will control the throttle speed.
- The Forward and Reverse button its direction.
- The STOP! button will send a emergency stop (DCC speed to -1) message to the locomotive.
- The Idle one will stop the locomotive smoothly (DCC speed to 0) (if the decoder has acceleration or braking rates enabled, the loco will speed up or slow down accordingly. If no momentum values are enabled, the loco will speed up or slow down abruptly.).
Control Panel config pane
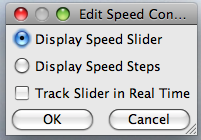
This pane if accessible by right clicking in the Control Panel pane and opening Properties menu entry
The Function Panel
The Function Panel has 28 function buttons available for each throttle. Most decoders currently don't handle 28 functions. The function panel displays the buttons in two groups, press the "*" button in the lower left corner to see the second set of function buttons.Clicking on the function buttons correlate to pressing the same function button on a hand-held throttle. The F0 function is normally used for the lights.
This is the basic functionality of the Function Panel. All buttons function like an on/off toggle - click once to turn "on"; click again to turn "off".
Function Button config pane
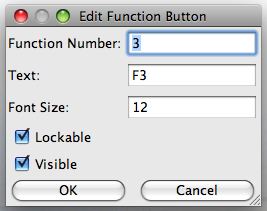
This pane if accessible by right clicking in the AddressPanel pane, on a specific Function Button and opening Properties menu entry.
Note that for Throttles that have an associated Roster, it is better to define these settings in the Function label pane in DecoderPro (however if you change them here, you can still export these changes to the Roster through the Export to Roster menu entry).
- Function Number - associates the button with a function number
- Text - customizable button label text
- Font Size - size of text displayed on button
- Lockable - identifies whether the button acts as an "on/off" toggle switch; or as a momentary switch
- Visible - identifies whether the button is visible in the Function Panel window
Warning! If any modifications are done to the "Function Number" field, verify to make sure that no two buttons are assigned the same function number - some unwanted consequences may occur.
The Text field will be the most welcome and modified field. By default, it is set similar to hand-held throttles: F1...F2...F3...etc. The content of the field is pretty much open to the imagination, however, there is going to be a point where the length of the text is not going to fit on the button. The Font Size field is available to also assist in getting the wanted text to fit on the button. A little experimentation will be required here to determine what looks good for you - and what will fit.
The Lockable check box may be a little confusing at first. When enabled - as it is by default - it simply means that when the button is clicked on, it will "lock" itself in either an "on" state or an "off" state. In other words, the button will act as a toggle switch - click once to turn the function "on"; click again to turn the function "off". The opposite of this action is what happens when the check box is disabled. Then the button acts like a momentary switch - supplying a momentary "on" command for as long as the mouse button is clicked and held over the button. When the mouse button is released, an "off" command is sent to the function. A good example of where one might want to use this is when customizing a throttle setup for a sound decoder. The horn/whistle is closer to functional when this option is disabled. Depending on the speed of the computer system and the DCC system, short and quick click and releases would provide a short blast of the horn or whistle. Holding down the button a little longer would produce a longer held blast of the whistle.
The Visible check box allows for the "removal" of unwanted buttons. By default, all function buttons are enabled as "visible" so that they can obviously be seen. But if there is only a single function being used - for example the "lights" (F0) - then this option does provide the ability to "hide" all of the other buttons.
Warning! Disabling the "Visible" check box should be one of the last steps performed during this customization process. The reason for this is that once the button is marked as "invisible" (by removing the check box), it is indeed invisible to the user and therefore can't be right-clicked on with the mouse in order to get the "Edit Function Button" window back. To make all buttons visible select "View->Show All Function Buttons."
Jynstruments
See there for more informations about Jynstruments.The Throttle Window is Jynstrumentable, particularly with more advanced function controls.
At the moment 3 sample Jynstruments are delivered, one for Light, one for Horn and one for Whistle (function 0, 1 and 2). But this is only a sample, have a look at the code and customize at will for your specific decoder needs.
Note that Throttle Window toolbar is Jynstrumentable too, so here we drop the Jynstruments on the window contentitself, not on the toolbar.
Thanks and congratulations to all who contributed!
Copyright © 1997 - 2018 JMRI Community.
JMRI®, DecoderPro®, PanelPro™, SignalPro™, TrainPro™, DispatcherPro™, OperationsPro™ and associated logos are our trademarks.
Additional information on copyright, trademarks and licenses is linked here.
Contact us via the JMRI users Groups.io group.
Site hosted by:
![]()
See also the site status page.