Current Throttle documentation
Please note that the Throttles Help was updated. Current version:
- The Throttle menu in JMRI
- The Throttle Window itself
- The Throttle Window menus
- The Throttle Window toolbar
- The Throttle Window controls
- The Throttles List Window
- The Throttles preferences pane
Throttles in JMRI v2.x
Advanced Configuration of the Function Panel
|
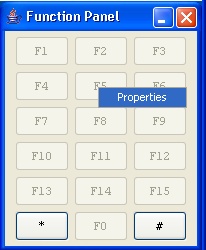
When a new throttle window is initialized, all function button labels are set up with a set of defaults (F1...F2...F3...etc.). These are closely related to hand-held throttles. But one of the cool features that the JMRI Throttles have to offer over hand-held throttles, is the ability to customize the button labels. In addition, each button can be hidden from view or switched to an "unlocked" button. The example image on the right shows the default Function Panel window. When the mouse pointer hovers over the top of the button, a right click of the mouse will display a menu with the only option on this menu at this time being "Properties". |
|
|
|
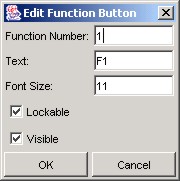
When the "Properties" option is clicked on, the "Edit Function Button" window opens (see the example image on the left).
|
By default, the Function Number is associated with the button number that you initially right-clicked on. For example, in the figures shown above, function number "1" (F1) is being edited. It is recommended that you leave this number as is, however, you can change this to a different function number if you really wish. An example of why you might want to do this is if you really want the "lights" button, which is usually F0 (located as the last/bottom button by default), to be located as the first button in the Function Panel.
Warning! If any modifications are done to the "Function Number" field, verify to make sure that no two buttons are assigned the same function number as some unwanted consequences may occur.
The Text field will be the most welcome and modified field. By default, it is set similar to hand-held throttles: F1...F2...F3...etc. The content of the field is pretty much open to the imagination, however, there is going to be a point where the length of the text is not going to fit on the button. The Font Size field is available to also assist in getting the wanted text to fit on the button. A little experimentation will be required here to determine what looks good for you and what will fit.
The Lockable check box may be a little confusing at first. When enabled, as it is by default, it simply means that when the button is clicked on, it will "lock" itself in either an "on" state or an "off" state. In other words, the button will act as a toggle switch: click once to turn the function "on"; click again to turn the function "off". The opposite of this action is what happens when the check box is disabled. Then the button acts like a momentary switch: supplying a momentary "on" command for as long as the mouse button is clicked and held over the button. When the mouse button is released, an "off" command is sent to the function. A good example of where one might want to use this is when customizing a throttle setup for a sound decoder. The horn/whistle is closer to functional when this option is disabled. Depending on the speed of the computer system and the DCC system, short and quick click and releases would provide a short blast of the horn or whistle. Holding down the button a little longer would produce a longer held blast of the whistle.
The Visible check box allows for the "removal" of unwanted buttons. By default, all function buttons are enabled as "visible" so that they can obviously be seen. But if there is only a single function being used, for example the "lights" (F0), then this option does provide the ability to "hide" all of the other buttons.
Warning! Disabling the "Visible" check box should be one of the last steps performed during this customization process. The reason for this is that once the button is marked as "invisible" (by removing the check box), it is indeed invisible to the user and therefore can't be right-clicked on with the mouse in order to get the "Edit Function Button" window back. To make all buttons visible select "View->Show All Function Buttons."
|
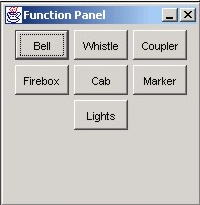
The image shown on the right shows an example of a finished customized function panel. This particular example was made for a steam locomotive with a sound decoder installed so there are additional functions needed for some of the sounds. These function buttons were all set up using the above outlined procedures. |
|
Throttle Window Menu Options
There are a few optional options that affect the general preferences of the overall JMRI Throttle window. These are found in a couple of menu options located just under the main title bar of the window.
View (Panels)
|
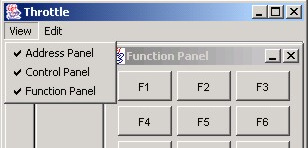
Clicking on the "View" menu option displays a small menu of 3 items. By default, each with a check mark preceding the item. This corresponds to the 3 sub-windows (Address Panel, Function Panel, & Control Panel) that make up the overall throttle window. |
|
|
|
As noted in Chapter 1, because each sub-window has a minimize and close buttons, if one gets closed down in error, this menu option allows you to restore the window again. Another way to use this option is when using the features of the throttles for decoders that are not associated with a motor (such as a lighted passenger car or caboose or a Fred unit). In these cases, critical screen real estate can be saved by being able to disable (or close down) the Control Panel. Be a little creative with the window resizing, and you could have several of these custom throttle windows in the same area as one single complete throttle window would take up. |
||
Edit (Frame Properties)
|
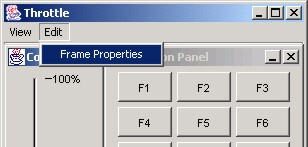
Clicking on the "Edit" menu option displays a single-optioned sub menu of "Frame Properties". This feature allows you to title the overall throttle window. By default, the title of the overall throttle window is titled "Throttle" and is displayed within the window border (see the figure on the right). |
|
|
|
When "Frame Properties" is clicked on, a single field dialog box will appear. Type in the title for your throttle window in this field. For example, "Santa Fe #8259 EMD-SD60" may be descriptive enough as a single locomotive. If the throttle is for a consist, you may want to identify it something like "Consist #221". Your only limitation is how many characters you can fit into the width of the window title bar. |
||
This chapter concludes the advanced throttle options that are currently available. The next chapter demonstrates how to save all these customized throttles into a "Throttle Layout" and then how to load them back again. You can use the right arrow below to go to this chapter now.
| TOC |

